Buscador is a Linux Virtual Machine that is pre-configured for online investigators and doxers.
Buscador – A VM for Hackers, Researchers & Investigators
Hackers can think of the Buscador OSINT virtual machine like an OSINT-focused version of Kali Linux. Based on Ubuntu rather than Debian, Buscador does not include the formidable set of cyber weaponry that Kali boasts, instead hand-picking a collection of useful OSINT, privacy, and capture tools into one stealthy package. Because avoiding detection is a goal of both investigators and hackers share, Buscador comes with Tor preinstalled and boasts other helpful privacy tools.
Buscador VM is also capable of being booted from a USB thumb drive on any available computer, as well as being loaded onto the hard disk and booted directly. This allows the flexibility of using it anywhere you have access to a computer, regardless of whether or not you have your personal device with you. At 3.5 GB, the VM image is compact and easy to carry on a flash drive that’s 8 GB or more.
Extensively documented in Mike Bazzell’s book, “Open Source Intelligence Techniques,” Buscador encourages good research habits and empowers researchers to find more clues in their investigations. Some familiar tools such as Maltego, Recon-ng, Creepy, Spiderfoot, TheHarvester, Sublist3r, and other tools we’ve covered on Null Byte are preinstalled.
It was developed by David Westcott and Michael Bazzell, and distributions are maintained on this page. The current build is 5GB and includes the following resources:
| Custom Firefox Browser & Add-Ons Custom Chrome Browser & Extensions Tor Browser Custom Video Manipulation Utilities Custom Video Download Utility Amass BleachBit EmailHarvester ExifTool EyeWitness Ghiro GIMP Google Earth Pro HTTrack Cloner InstaLooter KeePassXC Kleopatra Knock Pages LibreOffice LinkedInt Maltego |
Metagoofil MediaInfo Metadata Anylisation Toolkit PhoneInfoga Photon ReconDog Recon-NG SkipTracer SocialMapper Spiderfoot StegoSuite SubBrute Sublist3r theHarvester Tinfoleak Twint Twitter Exporter VeraCrypt VLC Yubico Utilities |
Installation Notes (2.0)
You will need a Virtual Machine application in order to use this system. VirtualBox is free and will suffice for most investigations. Some users prefer a more robust option with VMWare Workstation for Windows or VMWare Fusion for Mac. Any of these options will get you started.
VirtualBox Installation and Configuration:
* Make sure you have latest version of VirtualBox and VirtualBox Extension Pack installed
1) In the VirtualBox menu, click on File > Import Appliance
2) Navigate to the OVA file that was downloaded (Buscador)
3) Choose this file and select “Import”
4) Before starting the new machine, highlight it and choose “Settings”
5) Under General > Basic, rename this machine as desired (Buscador?)
6) Under General > Advanced, change Shared Clipboard to Bi-Directional
7) Under System > Motherboard, increase the RAM if you have ample resources (half of total system)
8) Under Display > Screen, increase the Video Memory to 128MB is available
9) Under Shared Folders, click the “plus” on the right, choose folder to store evidence, select “Auto-Mount”
10) Click “OK” twice, then launch the new machine (Double Click)
11) Upon boot, log into the user “osint” with the password of osint
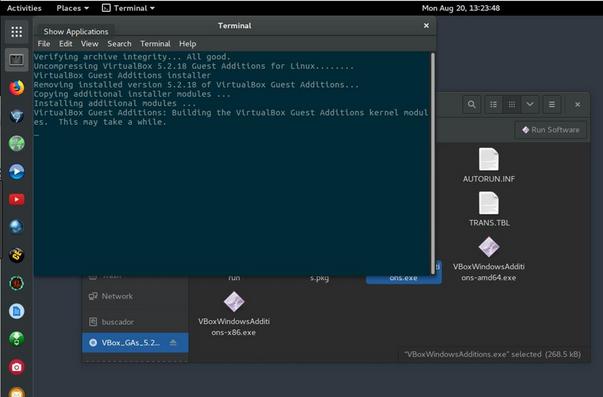
12) In the VirtualBox Menu, select Devices > “Insert Guest Additions CD Image”
13) Click “Cancel” when the dialogue box pops up.
14) Open Terminal (Tilex)
15) In Terminal, Create a directory on the Desktop titled vbox: mkdir ~/Desktop/vbox
16) Copy everything from the CD media on the Desktop to vbox folder (copy/paste)
17) In Terminal, input the following commands:
cd Desktop/vbox
chmod +x *.sh
./autorun.sh
(type password when prompted)
18) Allow the image to be installed, and reboot upon completion.
19) Start the Terminal in the new VM and type sudo adduser osint vboxsf
20) Provide the password as needed (osint)
21) Reboot
H8Mail – Email OSINT and password breach hunting.
You should now have access to the shared directory in order to save data to the host operating system (evidence). It can be found in the File Manager (Home), on the left column, titled “sf_” followed by the name of the folder to which it is connected. This shared folder will also be on your desktop for easy access. You can make the machine full-screen, copy and paste text to and from the image, and you are ready to begin using the applications.
VMWare Installation and Configuration:
1) In the VMWare menu, select File > Import > Select OVA
2) Select the location where the VM will be imported. Click “OK” Click “Retry” if the initial import fails
3) Power on the VM and Login to the OS
4) Install VMware tools as appropriate for your version:
VMWare Fusion: In the menu, select Virtual Machine > Install VMware Tools
VMWare Workstation: In the menu, select VM > Install VMware Tools
VMWare Player: In the menu, select Player > Manage > Install VMware Tools. Note:
5) Open (Double Click) the VMware Tools CD mounted on the desktop
6) Right-click the file that is similar to VMware.xx.tar.gz and click Extract to, and select Desktop
7) Open Terminal (Select ‘No’ to avoid an update) and type cd Desktop/vmware-tools-distrib
8) Type sudo ./vmware-install.pl and enter password (OSINT).
9) Type Y when prompted about downloading from the Linux repository
10) Accept all default values by striking the enter/return key at every prompt.
11) Reboot the VM
12) Enable Shared Folders from the file menu: Settings > Options > Shared Folders (Always Enabled)
13) Add a Shared Folder by selecting the desired folder on the host OS
14) Create a shortcut to the shared folder on the desktop with the following command in the terminal:
ln -s /mnt/hgfs/foldername /home/osint/Desktop/Shared_Folder
Usage Notes
A great feature of virtual machines is the use of Snapshots. These “frozen” moments in time allow you to revert to an original configuration or preserve an optimal setup. Most users install the virtual machine as detailed above, and then immediately create a snapshot of the unused environment. When your virtual machine eventually becomes contaminated with remnants of other investigations, or you accidentally remove or break a feature, you can simply revert to the previously created snapshot and eliminate the need to ever re-install.
VirtualBox use of Snapshots
1) Completely shut down the Virtual Machine
2) In the VirtualBox Menu, click on the Snapshots button in the upper right
3) Click on the blue camera icon to “take a snapshot”
4) Create a name and any notes to remind you of the state of the machine, such as “New Install”
5) Click OK
You can now use your virtual machine as normal. If you ever want to revert to the exact state of the machine that existed at the time of the snapshot, follow these instructions:
1) Completely shut down the Virtual Machine
2) In the VirtualBox Menu, click on the Snapshots button in the upper right
3) Select the desired snapshot to apply
4) Click on the blue camera icon with arrow to “restore snapshot”
5) Click Restore
Optionally, if you ever want to remove a snapshot, simply use the icon with a red X. This will remove data files to eliminate wasted space, but you cannot restore to that image once removed. It will not impact the current machine state. Many users remove old, redundant snapshots after creating newer clean machines.
VMWare Use of Snapshots (VMWare Workstation or Fusion, NOT Player)
1) Completely shut down the Virtual Machine
2) In the VMWare Menu, click on the Snapshots button in the upper right
3) Click on the camera icon to “take” a snapshot
4) Create a name and any notes to remind you of the state of the machine, such as “New Install”
5) Click Take
You can now use your virtual machine as normal. If you ever want to revert to the exact state of the machine that existed at the time of the snapshot, follow these instructions:
1) Completely shut down the Virtual Machine
2) In the VMWare Menu, click on the Snapshots button in the upper right
3) Select the desired snapshot to apply
4) Click on the camera icon with arrow to “restore” a snapshot
5) Click Restore
Optionally, if you ever want to remove a snapshot, simply use the “delete” icon. This will remove data files to eliminate wasted space, but you cannot restore to that image once removed. It will not impact the current machine state. Many users remove old, redundant snapshots after creating newer clean machines.
It is suggested to enable VMware autoprotect snapshots, set to daily, and limit the snapshot count to 3. Autoprotect snapshots are an easy way to always have a snapshot to revert to. The following steps will enable this feature.
1) Select the virtual machine and select VM > Settings
2) On the Options tab, select AutoProtect and select Enable AutoProtect
3) Select the “Daily” interval between snapshots
4) Select the maximum number of AutoProtect snapshots to retain (Recommended “3”)
5 Select OK to save your changes
After the maximum number of AutoProtect snapshots is reached, Workstation deletes the oldest AutoProtect snapshot each time a new AutoProtect snapshot is taken. This setting does not affect the number of manual snapshots that you can take and keep.
Yubikey Notes
You can use a Yubikey as a second factor for login from your Virtual Machine:
VirtualBox (Stable):
In the Buscador Terminal, copy/paste each line and click Enter:
    wget "https://raw.githubusercontent.com/Yubico/yubikey-personalization/master/69-yubikey.rules" -O /tmp/69-yubikey.rules
    wget "https://raw.githubusercontent.com/Yubico/yubikey-personalization/master/70-yubikey.rules" -O /tmp/70-yubikey.rules
    sudo mv /tmp/69-yubikey.rules /etc/udev/rules.d/69-yubikey.rules
    sudo mv /tmp/70-yubikey.rules /etc/udev/rules.d/70-yubikey.rules
Shut Buscador down completely
Insert Yubikey into computer
VirtualBox > Settings > Ports > USB > Click Icon with green “+”, select Yubikey, click OK
Remove Yubikey
Start Virtual Machine, boot completely into Buscador
Insert Yubikey
Attach Yubikey in VirtualBox > Device > USB . Yubikey
In the Terminal, type:
wget “https://raw.githubusercontent.com/beast-fighter/saves_the_day/master/activate_yubikey.sh”
chmod +x activate_yubikey.sh
./activate_yubikey.sh
When prompted, press Enter
When prompted to “Commit”, type y and hit Enter
Shut down Buscador completely
Remove Yubikey
Restart system, try to login with Yubikey (Fail)
Insert Yubikey, Login (Success) You may need to try password twice
VMWare (Experimental):
In the Buscador Terminal, copy/paste each line and click Enter:
    wget "https://raw.githubusercontent.com/Yubico/yubikey-personalization/master/69-yubikey.rules" -O /tmp/69-yubikey.rules
    wget "https://raw.githubusercontent.com/Yubico/yubikey-personalization/master/70-yubikey.rules" -O /tmp/70-yubikey.rules
    sudo mv /tmp/69-yubikey.rules /etc/udev/rules.d/69-yubikey.rules
    sudo mv /tmp/70-yubikey.rules /etc/udev/rules.d/70-yubikey.rules
Shut Buscador down completely
Insert Yubikey into computer
Open the .vmx file of your VMware image in a text editor
Add the following at the end of the .vmx file: usb.generic.allowHID = “TRUE”
Save the .vmx file
Start Buscador
Go to USB devices in the VMWare Menu and click on the Yubico.com device.
In the Terminal, type:
wget “https://raw.githubusercontent.com/beast-fighter/saves_the_day/master/activate_yubikey.sh”
chmod +x activate_yubikey.sh
./activate_yubikey.sh
When prompted, press Enter
When prompted to “Commit”, type y and hit Enter
Shut down Buscador completely
Remove Yubikey
Restart system, try to login with Yubikey (Fail)
Insert Yubikey, Login (Success) You may need to try password twice
Download Buscador
Buscador for VirtualBox:
Version: 2.0
Release: January 2019
GDrive Download (OVA file)
Checksum (MD5):
09dd771716502771af5f2bb86835e6c2
This is an OVA file that should work in any version of VirtualBox, including Windows, Mac, and Linux.
Buscador for VMWare:
Version: 2.0
Release: January 2019
GDrive Download (OVA file)
Checksum (MD5):
27f2d1ba37d1a15531ff34a050012ef4
This is an OVA file that should work in any version of VMWare, including Workstation, Fusion, and Player.
Main website – inteltechniques