
Virtual Private Networks (vpn) create an encrypted ‘tunnel’ between your computer and the host server, with the internet traffic going in and out of the host server. Your ISP or government can only see that you have connected to the VPN server and nothing else – your activities, IP addresses you have visited etc. are all completely hidden from them behind a minimum of 128-bit encryption, So in this tutorial you will be able to know how to setup free VPN service on Kali Linux and how possible is complete anonymity in cyber world.
However, the VPN server can see what you get up to on-line, which is why we feel it vital that a good VPN provider to keeps no logs. Anything less, and its users’ activities may be compromised (thus making the precaution of using a VPN in the first place redundant!).
Although setting up VPN does usually involve downloading and installing a VPN client, or otherwise configuring your computer or mobile device, the computing skills needed are minimal, and most providers supply detailed step-by-step setup guides in any case. One good thing is that once set up, all your internet activity, no matter which program you use, is now safely routed through the VPN.
The best vpns are those that keep no logs. The premise is that if the VPN provider receives a legal request from LE to provide details of who did what and when, they cannot point the finger at a particular user if they have no logs. This is the latest, most reliable (imo) list of such paid VPN providers: http://torrentfreak.com/which-vpn-services-take-your-anonymity-seriously-2014-edition-140315/
Why use VPN?
Here’s 11 reasons why you would want to use VPN services.
- VPN provides Privacy and cloaks your IP address.
- Use any network (public or private or free WiFi) with encryption
- Login to your home or Work network from anywhere with confidence.
- Bypass censorship and content monitoring.
- Browse and bypass Firewall and censorship policy at work or Anywhere!
- Access region restricted services from anywhere (i.e. Youtube videos, NetFlix or BBC Player etc.)
- Transfer or receive files with privacy.
- Hide your voice/VOIP calls.
- Use Search Engines while hiding some of your identity.
- Hide yourself
- Cause you like to be anonymous.
- Internet activity cannot be spied on by ISPs or governments
- High levels of encryption (128-bit to 2048-bit)
- All internet activity masked (once VPN set up on device)
- More expensive than proxies
- Can be a bit slow during peak times
- If VPN provider keeps logs then these may be obtained by the authorities
Free VPN Services!
The notable negatives to VPN are that it is comparatively pricey, and the encryption process taxes the servers so that when in heavy use internet access through them can slow down noticeably. There are plenty of free vpn providers but i have not found a free VPN who publishes any details about the logs they keep and the circumstances under which they would hand those over to a third party.
Here i am giving you a demonstration of setting up a free vpn service on Kali Linux (Security KISS) but don’t expect complete anonymity from this free vpn service.
Let’s start the configuration.
Step 1: Enable VPN on Kali Linux
By default , vpn is not configured in Kali Linux. If you want to connect vpn in kali linux , first install pptp and network openvpn in Kali linux using apt-get install. for this login to Kali linux as root user and type the following command in terminal.
aptitude -r install network-manager-openvpn-gnome network-manager-pptp network-manager-pptp-gnome network-manager-strongswan network-manager-vpnc network-manager-vpnc-gnome

On some cases, you might have to restart network-manager and networking, so type the following command:
service network-manager restart

Step 2: Enable IP forwarding
Check whether IP forwarding is enabled in Linux:
cat /proc/sys/net/ipv4/ip_forward

If it is zero (0) you need enable IP forwarding by:
echo 1 > /proc/sys/net/ipv4/ip_forward
gedit /etc/sysctl.conf
net.ipv4.ip_forward=1
Step 3: Register on Security KISS (vpn provider)
After successfully done the above two steps now time to register on Security KISS by clicking the following link:
Type your email id then click on create button.

Open your mail and login with given client ID and password to Client Area.

Download the configuration bundle from Client area (Use the download link generated in SecurityKISS Client Area).
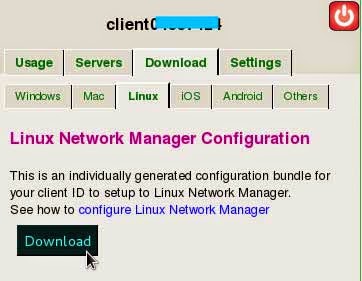
Unzip the files.

Now you have 4 files named client.crt, ca.crt, client.key and README.txt.
View the README.txt file to find the list of SecurityKISS gateways (In this tutorial i am gonna use the Miami gateway,you can see i am highlighted that in the following screenshot )

Step 4: Configure OpenVPN connection
In the network connections find ‘Configure VPN‘
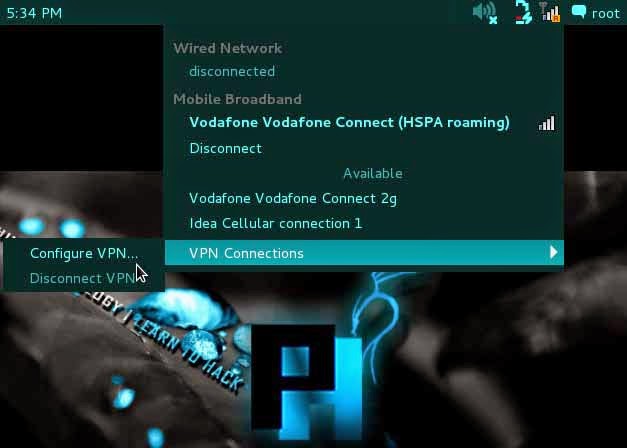
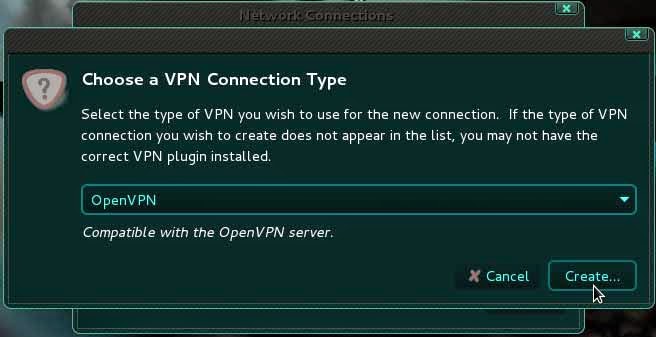
Select VPN tab and click on Add button.

Choose OpenVPN connection type and press Create button.
- Enter connection name indicating server location, protocol and port.
- In the Gateway field enter one of the IP address from the list you found in README.txt.
- Authentication type should be ‘Certificates (TLS)‘.
- Click on User Certificate and navigate to unzipped config file client.crt.
- Click on CA Certificate and navigate to unzipped config file ca.crt.
- Click on Private Key and navigate to unzipped config file client.key.
- Put in your password for your account.

Tick ‘Use LZO data compression‘ and ‘Use custom gateway port‘ check boxes.

Mark Available to all users then click on save button.

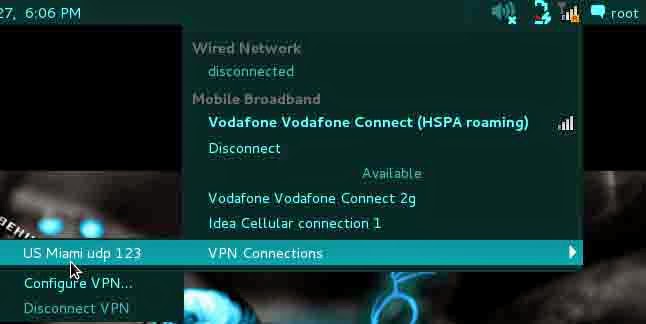
Step 5: Test the tunneled connection
Connect from the VPN connections.
Go to network manager and click to VPN Connections and connect.
You can verify if your IP address has changed by opening their geographical-location website:http://www.securitykiss.com/locate

Successfully connected to the free VPN.