One of the tools NCC Group released at this year’s Black Hat Arsenal is BinProxy, a tool for understanding and manipulating binary network traffic. In this post, we’ll take a quick tour of BinProxy’s main features and show how you might use the tool for assessing the security of an application that uses a custom protocol.
If you’ve done a web application penetration test, you’ve probably used an intercepting proxy, such as Burp Suite,ZAP, or Fiddler.1 While you could test a web app by watching the application’s HTTP(S) traffic in your browser’s developer tools and manually crafting requests with curl, it’s far more convenient to let the app do the work of logging you in, retrieving any initial data and populating all the request parameters that you can then tamper with.
For everything that isn’t HTTP, the current state of the art is more primitive. In the best case, for well-known protocols, you’re watching the application’s traffic (this time with Wireshark or tcpdump) and using that to craft manual requests with a protocol-specific client or library. If it’s a custom protocol, or if you want to send malformed messages, you might be writing your own client too.
BinProxy grew out of two things: (1) the desire to leverage the convenience of using an intercepting proxy instead of manual requests and (2) the realization that I was writing a lot of the baseline networking and proxying code over and over. I wanted to build that part once and then concentrate only on the interesting bits.
BinProxy gives you a TCP proxy and an interface to write protocol-specific parsers in Ruby using the BinDatalibrary, which defines a convenient declarative domain-specific language for specifying the fields in a message. You can then view and edit the protocol messages in a simple web-based UI.
Getting Started
To use BinProxy, you’ll need a recent version of Ruby (2.3+). BinProxy is available on RubyGems, so you can install it with the command:
gem install binproxy
You can also get the source on GitHub and follow the setup instructions in the README file there.
Intercepting Traffic
BinProxy can operate as a simple transparent proxy with a static upstream or a SOCKS or HTTPS2 proxy. Let’s say the client we want to investigate is a mobile application that provides a cloud-based “To-Do List.” After an initial investigation, we would learn that when logging in to the app it connects to server.example.com on port 5555 and then shows our outstanding items.
In order to direct the application to BinProxy, we set the device up on a network where we control the DNS and point server.example.com to our computer.
Next, on our computer, we run BinProxy:
binproxy $YOUR_PUBLIC_IP 5555 $REAL_SERVER_IP 5555
Tip: You may also want to include the --debug or --debug-extra flags for more console output. Seebinproxy --help for a list of other command line flags.
We’re now ready to capture some traffic!
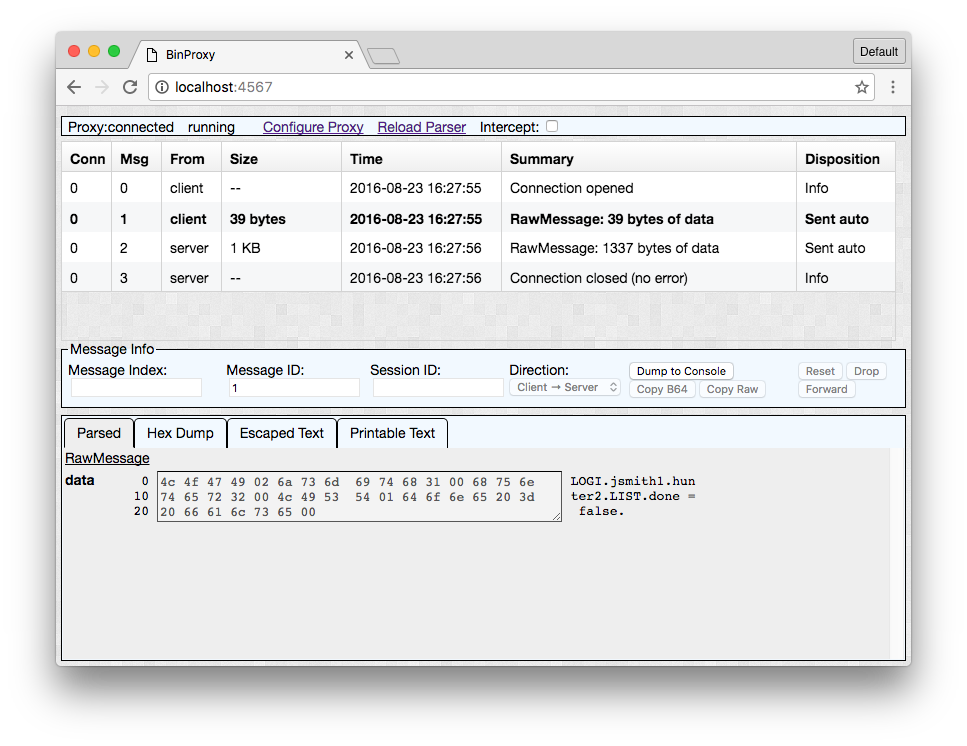
Next, we open our browser to http://localhost:4567/ and start using the client device. We’ll see the traffic appear in the browser window.
By default, BinProxy treats each TCP packet as one “message” and shows it as a hex dump.

Tip: The Parsed and Hex Dump tabs are basically the same here. But once you’ve written a parser, you can use the Hex Dump tab to see the original message. The Escaped Text tab is handy for pasting into string literals in a program or interactive language shell such as irb. Printable Text is similar to running strings on the raw message or your REPL of choice.
Writing a Parser
We’ll work with a fairly contrived example protocol. Below we can see that there are two messages here, a login and a “list” command. Each message has a command string (four bytes), an argument count (one byte), and a list of zero-terminated strings with command arguments:
4c 4f 47 49                            | LOGI
02                                     | 2 args
6a 73 6d 69 74 68 31 00                | "jsmith"
68 75 6e 74 65 72 32 00                | "hunter2"

4c 49 53 54                            | LIST
01                                     | 1 arg
64 6f 6e 65 20 3d 20 66 61 6c 73 65 00 | "done = false"
Now let’s make things a little easier to work with. Open up a text editor and create the file demo_protocol.rb.
require 'bindata'

class DemoProtocol < BinData::Record
  string :command, length: 4
  uint8 :num_args, value: lambda { args.length }
  array :args, type: :stringz, initial_length: :num_args
end
Here, we’ve defined a simple BinData class that parses the three fields we identified above. In a real world scenario, you might need to go through several iterations of the class as you identify what different byte sequences in the message represent.
Now, re-run BinProxy using your new class:
binproxy -c DemoProtocol
  $YOUR_PUBLIC_IP 5555 $REAL_SERVER_IP 5555
Binproxy will deduce the file name demo_protocol.rb from the class name; if you’ve named it something else, add the -C <filename> flag.
Generate some more traffic, and now you can see that BinProxy shows the parsed fields.


That “done = false” argument looks suspicious. Let’s say we’ve navigated around the app some more, viewed some other requests, and theorized that the server is doing some unsafe SQL construction:
SELECT * FROM todo_items
  WHERE user = ${current_user_id}
  AND ${arg} -- uh oh, raw SQL --
Back in the BinProxy UI, we hit the “Intercept” checkbox (1), and restart the client. We don’t want to mess with the login message right now, so we hit “Forward” (2). Selecting the list message, the args field (3) is editable.

We can now tack on or 1=1 and click Forward on this message. With luck, we’ll now see a bunch of other people’s items show up in our To-Do List in the app.