Getting started
For this tutorial I used the .ova image so the setup effort was virtually 0. on startup you should see some screens which look like the below:
Protip: Change the Ghiro users password
The Ghiro analyzer in action
one setup simply enter the machines IP in the browser to get started you should see a login window like the below:
The Ghiro Login Screen
The dashboard is the first image you will be greeted with upon logging into Ghiro. Like any good dashboard it supplies a quick overview of open cases, lists all image successes / failures, recently analysed files and a user count. The dashboard s sort of splunk-ish which gives it a nice familiar feel for anybody who has spent any great deal of time trawling through dashboards.
The Ghiro Dashboard
Using Ghiro to analyse images
Ghiro is extremely simple to get started create a case, once you have created a case you can add images to the case. Heres what my inaugural case file looks like:
Case_01 and contents
you can then either upload images from any machine which can access the page or add images via URL. Once the images are loaded Ghiro will start running its analysis against your saved images in a short period of time (literally less than a minute) you will have a detailed image analysis report for each image.
Below are some screenshots of Navigating Ghiros image analysis pages, note the hand geo-tagging features these are highly useful in creating timelines for your investigations.
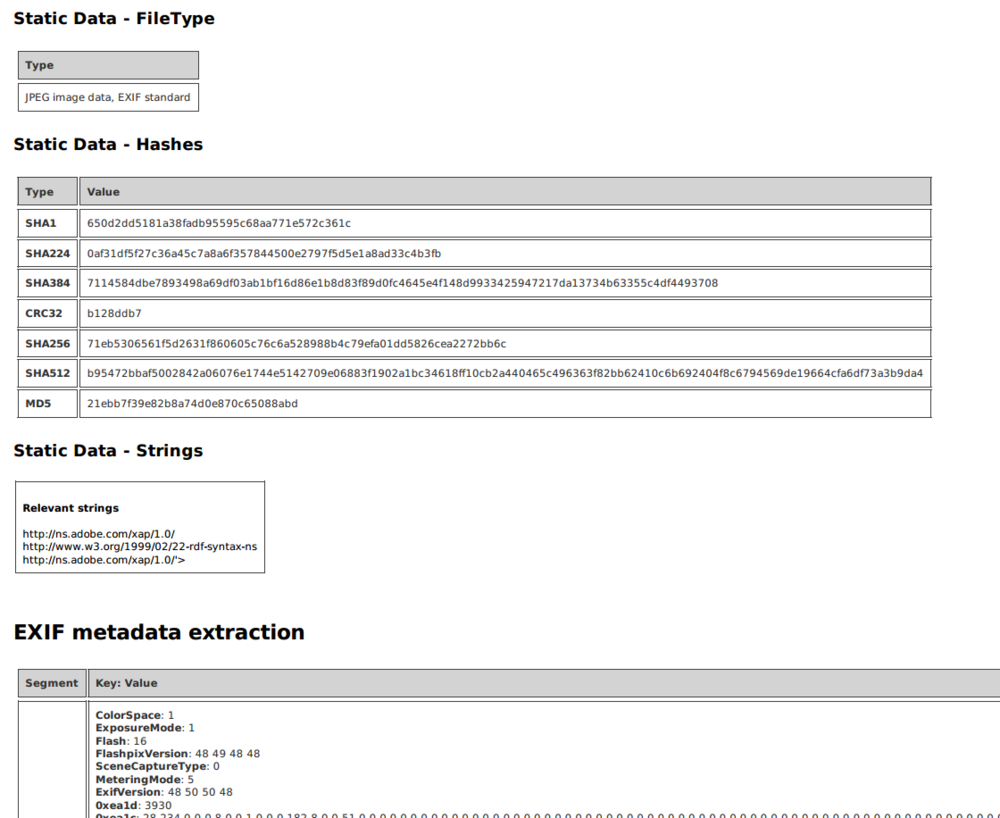
I was able to find an image that still had all of its metadata intact heres segments of the report output which reveals some information about how it was created:
As you can see its pretty easy to pull up a wealth of information about an image – with a large set of images you can piece together a lot of information from somebody’s image metadata.
Main features:
- Metadata Extraction
- GPS Localization
- MIME Information
- Error Level Analysis
- Thumbnail Extraction
- Thumbnail Consistency
- Signature Engine
- Hash Matching
Supported image types:
- Windows bitmap .bmp
- Raw Canon .cr2
- Raw Canon .crw
- Encapsulated PostScript .eps
- Graphics Interchange Format .gif
- JPEG File Interchange Format .jpg or .jpeg
- Raw Minolta .mrw
- Raw Olympus .orf
- Portable Network Graphics .png
- Raw Photoshop .psd
- Raw Fujifilm .raf
- Raw Panasonic .rw2
- Raw TARGA .tga
- Tagged Image File Format .tiff
Requirements:
- MongoDB: you need to run a MongoDB database (at least release 2.0)
- Python (only Python 2.x, at least release 2.7)
- Python-magic: for MIME extraction
- Python 2.x bindings for gobject-introspection libraries, required by Gexiv2
- Gexiv2: for metadata extraction (at least release 0.6.1)
- Pillow (Python Imaging library – PIL fork): for image manipulation
- Python-dateutil: for datetime manipulation
- Pymongo: driver for MongoDB (at least release 2.5)
- Django: for web interface (at least release 1.5, suggested django 1.6.x)
- Chardet: for text encoding detection
- Pdfkit: used for PDF report generation (at least release 0.4)
- Wkhtmltopdf: used by pdfkit
If you choose MySQL or PostgrSQL as database you have to install their additional drivers.