Facebook has faced repeated controversy over privacy, with features such as Graph Search revealing information which users might have forgotten they ever “shared”. But there are steps users can take to manage the way Facebook uses their information.
Facebook has once again found itself embroiled in controversy over privacy and ownership of data, after information emerged on a psychological experiment which involved altering the posts which appeared in users’ News Feeds in 2012.
Facebook has faced repeated controversy over privacy, with features such as Graph Search revealing information which users might have forgotten they ever “shared”.
Facebook settings explained
The only way to keep data truly private is not to share it on Facebook at all. But there are steps users can take using their Facebook settings to manage the way the social network uses data – and it’s worth refreshing your account, privacy-wise, even if you’re a seasoned and security-conscious site user, as new ‘features’ from Facebook often seem to involve further security concerns.
The most important thing to remember is that simply visiting the Facebook Settings menu is not enough. It’s a good first step, allowing you to take control of who you share posts with (see step one), how to control what other people post about you (step two) and apply quick controls to older posts (step three). But for a “deep clean”, you need to visit your profile page as well (click on your portrait in the top left of the main News Feed), and do some tidying in Activity Log, which details all your past posts and posts you have been tagged in (steps two and three). Facebook’s own guide to privacy offers some useful advice, broken down by section.
If you want to take control of your Facebook settings, it’s best done from a PC or Mac – Facebook’s mobile apps don’t offer the fine control that the browser version does.
Below are five quick steps to changing your Facebook settings and to ensure you’re managing what people know about you effectively.
1. Take control of your posts
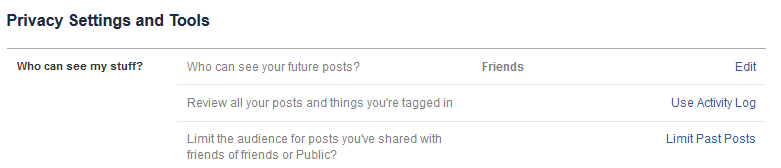
The first step to ensuring you are not “oversharing” on Facebook is to use and understand Facebook’s Audience Selector tool. This appears as a drop-down menu on every picture, post and link you share (or have shared) on the network. You can also use this menu to limit posts retrospectively (a useful tool if you’re worried about work colleagues finding pictures you might have shared years ago).
Facebook has a detailed guide to using Audience Selector. It’s worth noting that if you share something once, then share it again, it will share with the audience you first selected by default. Be sure you know what audience you are sharing with – and that means policing your Friends list regularly. There’s little point limiting posts if you’re friends with people you don’t really know. If you have ever accepted a friend request from someone you don’t know (for instance, in a social game), it’s best to unfriend them. Befriending people on networks such as Facebook is a known tactic for identity fraudsters and other criminals – so it’s worth being cautious.

Use this menu to control who posts are shared with
Once you’ve pruned your Friends list, you should limit ALL posts to Friends Only. That way you know who is seeing your posts. If anything is set to share with “Friends of Friends”, that basically means “anyone”. You have no control over who your friends have made friends with on the network and trusting your data to these unknowns is unwise.
Trusting people you don’t know with your data has become even more risky due to the site’s new search engine, Graph Search. This lets any Facebook user search for things such as people’s Facebook Likes, or even their location, with search terms such as, “People who like pizza who live in…”. This can reveal data which could be damaging. One of the key steps to controlling any data on Facebook is to ensure that all posts are set to “Friends Only” or “Only Me”.
Make sure all your Facebook settings – photos, Likes, personal information – is set either to share with Friends Only or Only Me. You’ll have to visit both the main Privacy menu (under Settings) and Activity Log (under your Timeline, which is accessed by clicking your picture from the main menu), to ensure past posts don’t come back to haunt you.
2. Manage posts other people have tagged you in
Facebook’s Graph Search, introduced last year, radically increased the speed at which people could find information and images about people on Facebook. The tool, a powerful search engine built using Microsoft’s Bing, can “reveal” posts which are hidden from user timelines, and which users may have forgotten existed. It can also, worryingly, be used to find posts in which a user has been tagged – and managing this data requires an investment of time.
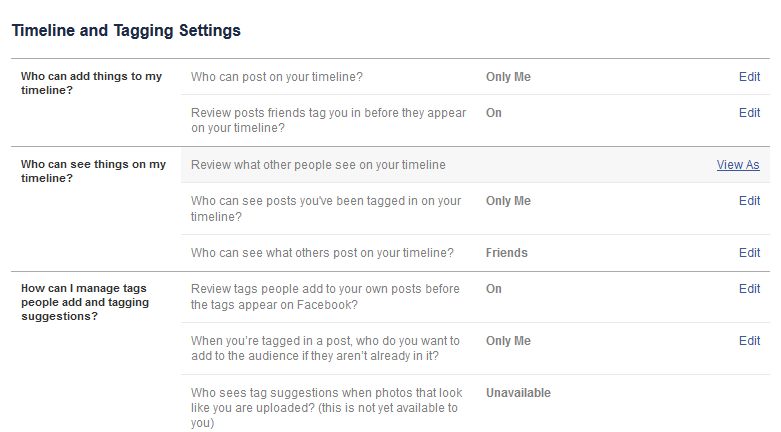
To regain control over tagging, you should use Facebook”s ‘review’ process, which allows you to approve whether you can be tagged in images and other posts. This allows you to refuse a tag, for instance, if it’s a private post and you’re not comfortable sharing it with colleagues. You can still be seen in the photo, of course, but it will not appear in your Timeline or via a search for your name. You will have to review each picture for it to appear – but the added security is worth the effort. To enable Tag Review, visit Facebook Settings, then Timeline and Tagging, then Review Tags. Set the menu to Enabled.
When you approve posts, it’s worth revisiting Audience Selector to see who they’re shared with. People often share posts with the friends lists of everyone in a photo, or with all guests at an event. If you’re not comfortable with this, but still want to share the post, choose Custom from the Audience Selector menu, and exclude people you don’t want to see it (for instance Friends of Those Tagged).
It’s also worth using Facebook’s Timeline to police photos you may have been tagged with in the past. Visit Activity Log (a box on the right hand side of your profile page, which you can access by clicking your portrait from the top right of the main news feed). This will allow you to see a full list of posts from your Timeline. Mouse over the picture or post you want to remove, click the down arrow, then click report/remove tag.
If you have previously hidden posts from Timeline, you should revisit them and set Audience Selector to “Only Me”. This ensures that people cannot find posts using Graph Search – posts hidden from your Timeline can still be visible, confusingly.
You will have to do this manually. Graph Search will not show off any photos or posts that are set to be private – i.e. ones that can be seen by “Only Me” or “Friends” – so choose these to be safe.
3. Make sure your Timeline doesn’t trip you up
Your Timeline is not a reliable indicator of what someone can find relating to you on Facebook – whether that be photos, comments, or Likes. Posts you have hidden from Timeline may well be visible – just not to someone browsing your page. If they search instead, for say “Photos of [Your Name]”, they’ll be clearly visible unless you’ve taken steps to alter your Facebook settings to police this.
The only tool which works to keep information private is Activity Log, which requires you to adjust privacy settings manually for each post. It’s worth doing – otherwise, site users can simply search your name, and “Photographs” to see every post that you are tagged in, regardless of whether it’s on your Timeline or not.
4. Delete your search history
For many Facebook users, it might come as news that Facebook stores your search history at all – but it does, and tailors the results you receive accordingly. This data can be quite private – for instance, if you’ve searched repeatedly for a specific person, this can be very obvious, even if someone happens to glance over your shoulder as you use the site, as the function will auto-suggest the names you’ve searched for most frequently.
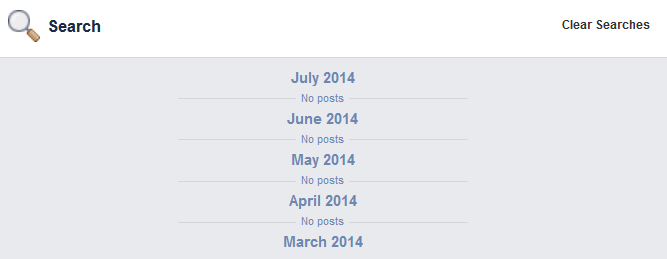
Thankfully, it’’s possible to delete this data entirely within your Facebook settings. Go to Activity Log (one of the options at the top of your Profile page), then select More, then Search. From this page, you’ll be given options to delete either individual searches, or your entire search history. By default, Facebook stores this data, and it’s available to anyone who sits down at a PC logged into your account.
5. Permanently delete your account – if you need to
From Facebook’s menus, it appears as if deactivating an account is the closest Facebook will let you get to deletion – but it’s actually possible to delete your account entirely.
This is a fairly drastic step, and it may be advisable to download a copy of your Facebook data before doing it. Otherwise it can be accessed by clicking the menu, then Facebook Settings, then the menu option, Download a copy of your Facebook data (below your General Account Settings), then Start My Archive.
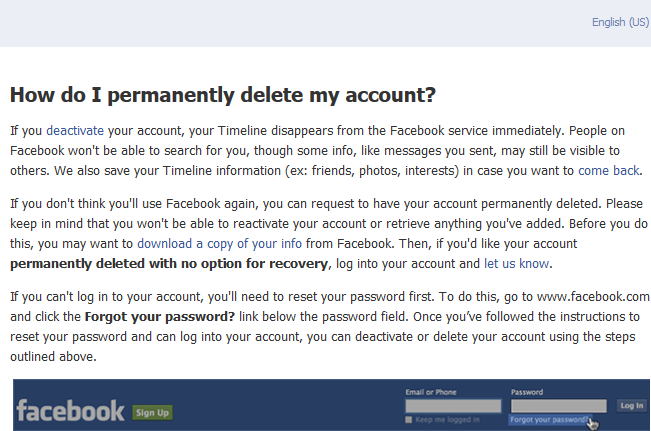
A page with instructions on how to permanently delete your account is available here (note: you have to be logged in to Facebook to read these instructions, and following them will send a deletion request for that account). Once done, you have 14 days in which you can log back in and cancel the request, but after that point, there is no way to restore the data, and (crucially) people will not be able to search for or see your profile or any content you have shared on Facebook.
For a ‘softer’ option, ‘deactivating’ an account (found under Settings), lets you hide your profile and photos from Search, but the account can be reactivated, and some interactions (such as comments on other people’s pages) may still be visible.