Short Bytes: File History is a data backup feature for Microsoft Windows operating system. You can use it to automatically backup files to external, internal or network connected storage and restore them at a later stage. It’s visible as an option in the Control Panel. File History was intended to be the successor to the Windows Backup and Restore utility.
With the ever-increasing collection of photos, music, videos, and other types of files on our computers, most of us are in constant fear. Our data might fall prey into the hands of some power outage, hard drive failure or some other error.
If we talk about the Windows operating system, one possible way to backup data is to copy all the important files to an external hard drive on a daily basis. That’s what many people do. Another one, for the lazy humans, is to use some software that saves the files to the external storage media or a network-connected storage on its own.
What is Windows File History?
Earlier Windows versions had an inbuilt data backup utility known as Backup And Restore. Later, a more advanced Windows backup utility came with the arrival of Windows 8, and it has been carried forward to Windows 10 also.
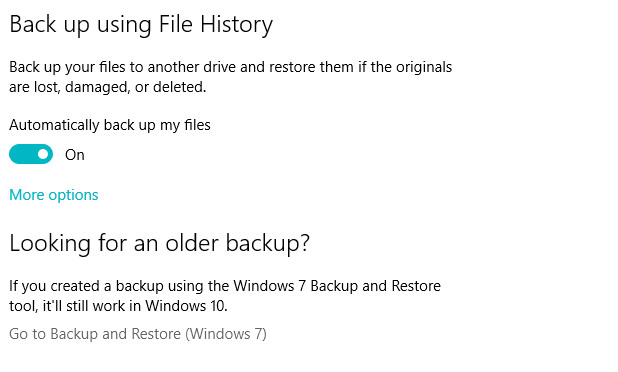
Microsoft wanted to replace Backup and Restore with File History. They even removed the former in Windows 8.1, but it reappeared in Windows 10 as Backup and Restore (Windows 7).
How does File History work in Windows 10?
File History does the same job of backing up files, but it follows a technique called Continous Data Backup which means the system can backup files in real-time. Similar to its older counterpart, File History supports incremental backups where successive copies of data only contain what has been changed since the last backup.
It can also save multiple iterations of the same file, thus, replacing the Windows feature called Previous Versions. So, it’s possible to restore an earlier version of a file quickly using File History.
How To Backup Data in Windows 10 Using File History?
Saving your files and folders to an external media with the help of the File History is a relatively simple task which involves a couple of clicks. You can start with an empty USB drive if your data is less, or a hard disk if you have loads of photos and videos to backup. Make sure it’s formatted according to the NTFS file system.
Follow the steps mentioned below:
- Connect the external storage media to your computer.
- Go to Settings > Update & Security > Backup.

- There you’ll find the option to turn on the file history feature.
- Click Add a drive. Select the media with which you want to use the File History feature.
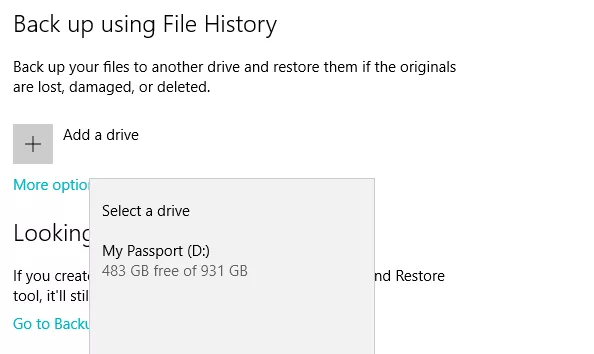
- Once you click the name of the storage media, File History will start saving data on your hard drive.


During the initial setup, it’ll take some time depending on the amount data to be copied. File History will continue to do its work until you manually turn it off (Don’t do it while it’s running for the first time). It’ll backup files and folders from predefined locations in Windows after the specified period.
Another way to access File History, its standard Windows look, is by visiting Control Panel > File History. Click the Turn On button to start File History.

To choose a network location, click Select Drive from the left pane and click Add network location. File History can also work if you have a separate internal hard drive on your computer.
What data is copied using File History?
By default, Windows File History has been configured to automatically backup data from Desktop, Home Group Folders and Windows library folders like Downloads, Pictures, Documents, Videos, etc. If a folder is added by some other application like Virtual Box, it’ll also be backed up.
You can click More Options to view the Backup Options screen where the folders eligible for backup are listed. You can add more folders if your want. To delete a folder from the list, click it and then click Remove.

On the top of the Backup options screen, you will find the option to set the backup frequency, and time limit after which the system should delete the backups. It also shows the size of the data backup created using File History.
Scroll down to add excluded folders which you don’t want File History to copy to your storage media.
If you want to use another storage media for File History, it would require you disconnect the existing File History drive. You can do the same by visiting the Backup options screen. Go to the bottom and click Stop using drive under Backup to a different drive.
How to restore data in Windows 10 using File History?
To get back the data from your File History Drive at a later stage, you will have to use the Control Panel-based version of File History. Once you’re there, click Restore personal files on the left-hand side and a new window will open containing all the backup folders. Select anyone of them and click the Restore button to save the files to their original location.

You can restore the contents of a folder to a different location. Select a folder, click the gear button in the top-right corner of the window and click Restore to. After this, you can select the desired location.
Also, you can double-click a folder to see what it contains and restore individual files. Use the search bar in the File History window to find specific files from the backup. You can preview files before restoring them, double-click to open a file using its default app.
How to Restore the Previous Versions of files and folders?
You already know that File History can keep multiple versions of files. Use the arrow buttons to view a different version of files and folders backed by File History.
You can delete them whenever you want if there is no need for those files to capture valuable storage. To delete previous data, click Advanced Settings > Clean up versions.

You can select the age of the previous versions you want to the system to delete. The default is to delete the versions which are older than one year.
So, this was a brief walkthrough of the Windows 10 File History feature and how to backup and restore data in Windows using File History.
In case we missed something, let us know in comments.