Taking a screenshot on your device is a task that many people do almost every day. It could be some hilarious meme, inspirational blog post, or something important that you find. Screenshots are probably the easiest, if not the most efficient, way to save such information on your device.
Now, if you’re wondering how to take a screenshot on a PC, then let me assure you that there are many screenshot software that can help you in this case. I have included third-party apps in this list as well as internal tools for Windows 10 that you might be aware of.
Here, I want to clarify one of the confusions that you might have. Screen recording tools are not the same as screenshot tools. If you’re looking for the former, then we have created a separate list of Windows 10 screen recording tools.
How to take a screenshot on Windows 10?
If we just talk about Windows 10 (and older versions), there are three different tools that allow you to take a screenshot on your Windows PC —
Windows 10 Print Screen tool
Now, you might be very well aware of this but I still recommend it because even in 2019, the easiest way to take a screenshot on Windows 10 is to use the Print Screen tool.
The Print Screen key is present on almost every laptop and desktop that’s not made by Apple. But, simply pressing the Print Screen key alone won’t do anything on your machine.
You need to use the Windows 10 screenshot shortcut to get things done. I’m still trying to figure out why that is the case when there is a dedicated key for screenshots.
So, you can use the keyboard shortcut Windows + Print Screen to grab the entire screen at once.
If, for some reason, your PC doesn’t have the print screen key, you can press Windows + Fn + Space to take a screenshot.
Where are screenshots saved?
When you take a screenshot using the above-mentioned feature, the screen just dims for a second and gets back to normal. Screenshots you have captured are saved in File Explorer > Pictures > Screenshots.
Windows 10 Print Screen is not working
If for some reason you’re not able to take screenshots using the print key then there are some things you can try.
- Make sure other third-party screenshot tools aren’t running on your machine
- Update your keyboard drivers
- The function key needs to be pressed on some PCs to use the Print Screen key.
- Try to update your Windows 10 version.
Windows 10 Snip & Sketch tool

The next built-in Windows 10 screen capture tool is called Snip & Sketch. It’s a replacement for the Windows 10 snipping tool that you’ve already been familiar with for so many years.
Snip & Sketch provides different screen capture options including full-screen, window capture, free-form capture, and rectangular capture.
Other than looks, one advantage it has over other built-in Windows 10 screenshot tools is that you can resize your rectangular snips which you can’t do with the Print Screen option or even the snipping tool.
You get the option to delay the screen capture time by up to 10 seconds. After capturing the screen, you can add annotations and scribble on the screen grab. You can also share your final output from within the Snip & Sketch app itself.
Windows + Shift + S
Snip & Sketch will provide you with a dedicated keyboard shortcut Windows + Shift + S which opens the tool without much effort.
Also, there is another trick you can do on your Windows 10 PC. You can configure the Print Screen button to open the Snip & Sketch tool.
Go to Settings > Ease of Access > Keyboard. Here, under the Print Screen shortcut, enable the toggle button under Use the PrtScn button open screen snipping. Next, restart your PC. After that, you can simply press the button to open the screenshot tool.
Windows 10 Snip tool

The third built-in Windows 10 screenshot tool is the Snipping tool. As I just mentioned, it has been there for ages. But recently, Microsoft updated the screen capture tool to support different modes including free-form, rectangular, Windows, and full screen.
Probably, this could be due to the fact that Snip & Sketch is not available on older Windows versions. Microsoft eventually plans to phase out the old snipping tool on Windows 10.
However, unlike the other tool, you can only delay the screen capture for up to five seconds. You can click on Option to explore more settings related to the Windows snipping tool.
How to take a screenshot on Windows 10 using third-party apps?
Now, if you’re not satisfied with the Windows 10 screenshot app made by Microsoft, then don’t worry because there are a lot of third party options that you can explore.
So, here are some third-party Windows 10 screen capture apps:
1. Lightshot

I have used this Windows 10 screen capture app for a couple of months but then one day reset my PC and forgot to re-install it. Still, it comes for free and offers a decent number of features that could be helpful.
You can open Lightshot by pressing the Print Screen key — you don’t need to use any shortcuts. Now, if you’re wondering, the Windows 10 screenshot shortcut still works for the print screen feature.
2. Mozilla Firefox

If you mostly take screenshots of websites then why go so far? You can switch to Mozilla Firefox, which offers a robust screenshot tool for PC users.
One advantage is that it automatically captures on the website and doesn’t take the UI of the browser. So, you can save some useful minutes on cutting out the extra part.
How to use the Firefox screenshot tool?
Go to any website > click on the three-dot button near the address bar.
You get three screen grabbing options. You can capture only the visible part, go for long screenshots, or you can manually choose the area.
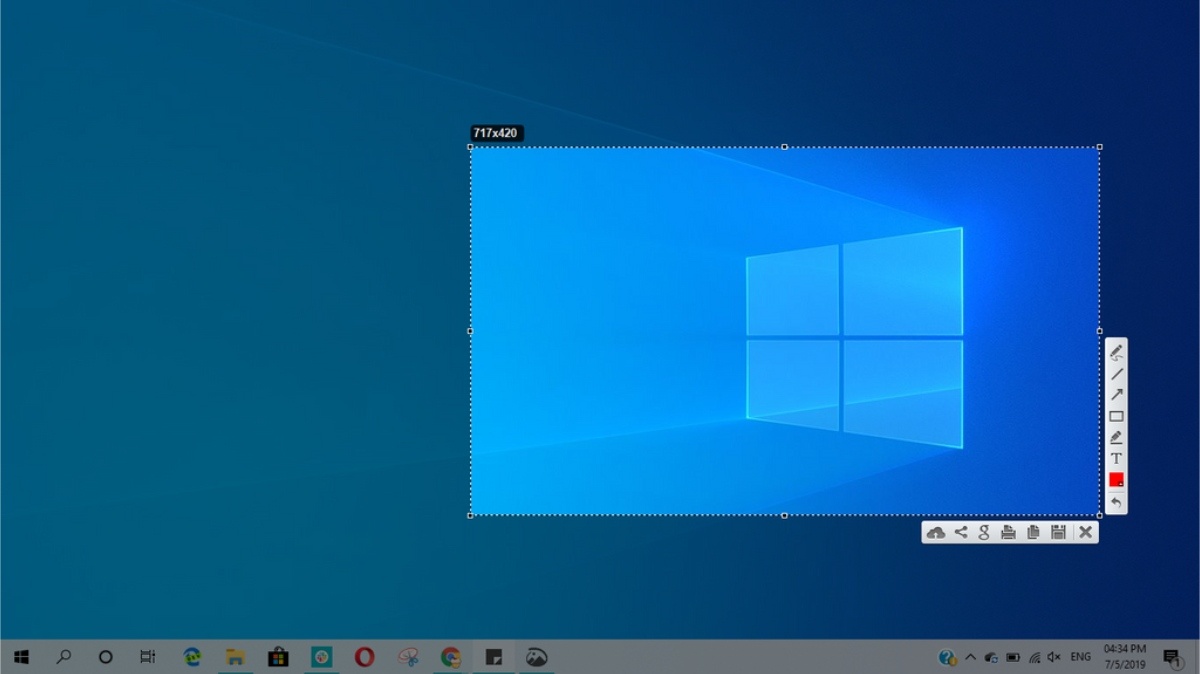
3. ShareX

Now, if you want a Windows screenshot tool that’s packed with features, then ShareX is the name. Although it doesn’t carry the looks of modern UWP apps, ShareX can improve your screen capture experience by a considerable degree. On top of that, ShareX is an open-source screenshot tool.
This free screenshot tool supports the Print Screen keyboard shortcuts on Windows and also lets you record your screen. You have got different screen capture modes just like other tools mentioned above, you can also hide/show mouse cursor, take scrolling screenshots, choose a specific region and also create GIFs.
You can also choose what happens after a screenshot is taken and automate tasks. For example, whether you want to print the image or simply save it to a file.
4. Nvidia GeForce Experience
This Windows 10 screenshot method specifically applies to the machines running an Nvidia GPU that’s compatible with Shadow Play.
While playing games, you can simply press the keyboard shortcut Alt + F1 to take screenshots. If you want, you can change the default save location of the screenshots in the GeForce Experience app.
Furthermore, Shadow Play also lets you record your gameplay sessions.
5. AMD ReLive
In the same way, if you have an AMD GPU installed on your machine, then you can take screenshots on your PC during gaming sessions. There is an app called AMD ReLive.
Not just screenshots, the AMD tool lets your screen record your gameplay sessions and you can even create a GIF with the press of a single button.
So, guys, these are some ways to use which you can take a screenshot on your PC. As always, all of these Windows screenshot software we have mentioned are available for free. So, you can switch between them anytime you want.