Just recently I stumbled upon an Android app that lets you receive free products in various pubs, restaurants or cafes in exchange for points accumulated with previous purchases. When the purchase is made, you let the vendor know that you want to receive points. In the app you select the types of products you bought. The eligible types of products may be “Beer”, “Lunch” or“Spent 50 PLN”. It all depends on the place. In order to verify the purchase, the vendor needs to swipe a physical beacon device over your phone (or enter a PIN if that doesn’t work) and the application magically approves the transaction, granting you points.
As an example, one of the places offers you a free beer for 5 points and each purchased beer grants you 1 point. That gives you a free beer for every 5 purchased beers in that place.
Everyone likes free beer, so the first thing I thought about is how secure the purchase verification process is and how exactly do these magical beacons work?
More importantly, was there any way to get around the application’s security and get a taste of free beer?
![]()
I intentionally don’t want to mention the name of the application as it only operates in my home country (in Poland). My goal is to give you an idea of what flaws similar applications may have, how to find them and how to better secure such applications. I’ve retained all technical details on how the application works, occasionaly replacing some easy to identify IDs or private information with random data.
In this post I will use a fictional name for the discussed application – “EatApp”.
With that out of the way, let’s get started!
Doing the research
The first thing I was most curious about was the beacon technology that is used with the application. The beacons apparently communicate with the mobile phone over bluetooth as the application made it clear that bluetooth needs to be turned on for the beacon swipes to work.
After a very short time I found the company that manufactures the same beacons that I saw working with EatApp. The company is Estimote and this is what they write about their beacon technology:
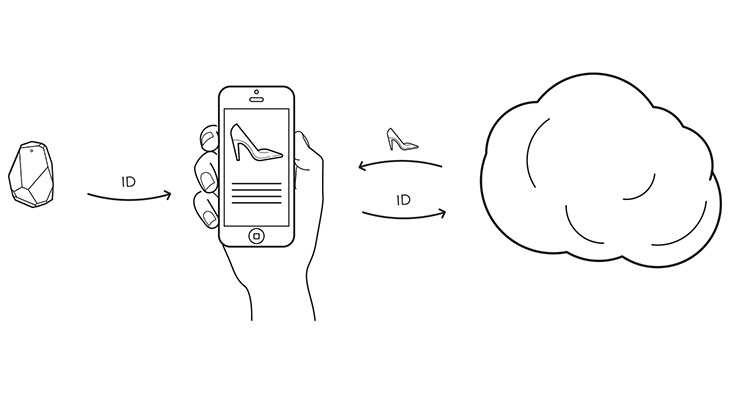
Estimote Beacons and Stickers are small wireless sensors that you can attach to any location or object. They broadcast tiny radio signals which your smartphone can receive and interpret, unlocking micro-location and contextual awareness.
With the Estimote SDK, apps on your smartphone are able to understand their proximity to nearby locations and objects, recognizing their type, ownership, approximate location, temperature and motion. Use this data to build a new generation of magical mobile apps that connect the real world to your smart device.
Estimote Beacons are certified Apple iBeacon™ compatible as well as support Eddystone™, an open beacon format from Google.
Apparently EatApp application detects the restaurant’s beacon in close proximity, retrieves some identification values from the device and uses them to authorize the registration of new points with EatApp server.
Thankfully Estimote has released an SDK with a very detailed documentation.
That allowed me to learn more about what information the beacon transmits. More technical information says that:
Estimote Beacon is a small computer. Its 32-bit ARM® Cortex M0 CPU is accompanied by accelerometer, temperature sensor, and what is most important—2.4 GHz radio using Bluetooth 4.0 Smart, also known as BLE or Bluetooth low energy.
I’ve also learned that beacons broadcast the following values:
- UUID – most commonly represented as a string, e.g. “B9407F30-F5F8-466E-AFF9-25556B57FE6D”
- Major number – an unsigned short integer, i.e., an integer ranging from 1 to 65535, (0 is a reserved value)
- Minor number – also an unsigned short integer, like the major number.
Great! They also provide their own Android library to make it very easy for any application to listen to beacon broadcasts. Here is one of the example code snippets from the tutorial on how to set up the beacon listener:
beaconManager = new BeaconManager(getApplicationContext());
// add this below:
beaconManager.connect(new BeaconManager.ServiceReadyCallback() {
    @Override
    public void onServiceReady() {
        beaconManager.startMonitoring(new Region(
                "monitored region",
                UUID.fromString("B9407F30-F5F8-466E-AFF9-25556B57FE6D"),
                22504, 48827));
    }
});
It looks to me that the UUID number must be constant and unique to the application using it. Major and Minor numbers on the other hand can describe the product, so in EatApp scenario they must be unique for every restaurant.
Whenever the application waits for the vendor to swipe their beacon over the phone, it listens for packets with specific UUID. If the broadcast packet is detected, it uses signal strength value to measure the beacon’s proximity to the Android device. If the beacon’s signal strength indicates that the device is close enough, it uses the Major and Minor numbers from the packet as validation keys, which are sent with the authorization packet to the EatApp’sserver.
I wondered what was the maximum range over which, the beacon was able to transmit its packets. The application must be constantly listening for beacon broadcast messages as it even gives you a push notification when you enter the restaurant where EatApp beacon is present. I didn’t have to search long for an answer:
Estimote Beacons have a range of up to 70 meters (230 feet). The signal, however, can be diffracted, interfered with, or absorbed by water (including the human body). That’s why in real world conditions you should expect range of about 40–50 meters.
Wow. Up to 70 meters? That means that in theory the security keys (UUID,Major and Minor numbers), that are very likely used for authorizing the rewards, are broadcasted in clear air! That can’t be good.
Knowing that beacon broadcast packets can be received over such range, I needed to find a way how to receive the packets and read their contents. It would probably take me few days to write my own Android app using Estimote SDK, but thankfully Estimote provides their own Estimote Developer App for debugging and troubleshooting problems. From the screenshots I could tell that it gathers all the critical information.
At that moment, obtaining the beacon information would not do me much good without any insight on how the application communicates with the server. It was time to set up a small lab for intercepting and decrypting HTTPS communication from the mobile phone.
The Fiddler in the Middle
For intercepting mobile phone traffic, I’ve used a Windows box. The best and free HTTP/HTTPS Windows proxy for inspecting and forging new packets, that I know of, is Fiddler.
Setting up Fiddler
In order to enable HTTPS interception in Fiddler, open Tools > Telerik Fiddler Options > HTTPS and make sure Capture HTTPS CONNECTs and Decrypt HTTPS traffic is checked. Also make sure that under Tools > Telerik Fiddler Options > Connections, you ticked the Allow remote computers to connectoption.
You will also need to export Fiddler’s Certificate Authority certificate. In the same tab, click Actions and click Export Root Certificate to Desktop like so:

This will put a file named FiddlerRoot.cer on your desktop. This is the root certificate that Fiddler will use to generate forged certificates for every HTTPS connection that goes through the proxy. Obviously Fiddler’s generated root certificate won’t be on your phone’s list of trusted certificate authorities and any HTTPS connection that goes through the proxy will be blocked. That’s why you need to import Fiddler’s certificate on your phone and add it to trusted CA storage.
To do that, first copy the FiddlerRoot.cer to the SD card on your phone by any means. On your phone open Settings > Security and select Install from SD card:
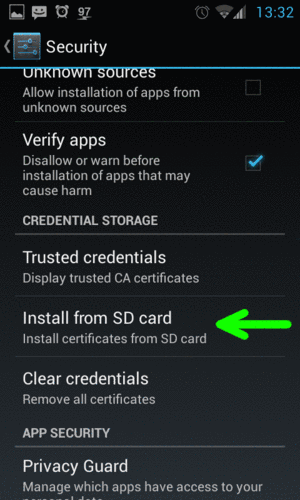
Find and pick Fiddler’s certificate file in order to import it. Now your phone will trust Fiddler’s proxy and you will be able to intercept and decrypt HTTPS traffic. You need to make sure that both your phone and your Windows box with Fiddler are running on the same network.
Before you proceed, find out which port Fiddler’s proxy listens on, by openingTools > Telerik Fiddler Options > Connections and checking the port box:

Next, find out the local network IP address of your Windows box. Open upcmd.exe command line prompt and type in ipconfig. You should be able to find your current IP address under the section with the network interface that you are currently using.
On your Android phone, open up Settings > Wi-Fi and find the wireless network that you are connected to. Touch the network entry for 2 seconds and select Modify network from the drop-down menu. In the dialog tick Advanced options and scroll down to proxy settings. For the proxy type you need to setManual and under hostname and proxy port enter the IP address of your Windows box and the Fiddler’s proxy port. I entered 192.168.0.14 as the hostname and 9090 as the proxy port number.
Now if everything went fine, you should be able to see the outgoing mobile phone traffic in Fiddler.
Capturing traffic
With this setup I was able to intercept EatApp’s traffic as the application didn’t implement certificate pinning. Otherwise, it would require more work to be done. I’d have to decompile the application, remove the certificate comparison check and recompile the application.
I opened up EatApp and opened up Earn Points dialog for randomly picked restaurant. As I didn’t have the restaurant’s Estimote Beacon on me (duh!), I had to use the option to enter the PIN number to verify the point rewards. I entered the random PIN number and checked the intercepted packets in Fiddler.
Sent request:
POST https://api.eatapp.com/users/461845f5d03e6c052a43afbc/points HTTP/1.1
Accept: application/json
Accept-Language: en-us
X-App-Version: 1.28.0
User-Agent: Dalvik/1.6.0 (Linux; U; Android 4.4.4;)
...
Content-Type: application/json; charset=UTF-8
Content-Length: 265
Host: api.eatapp.com
Connection: Keep-Alive
Accept-Encoding: gzip

{
  "authentication_token":"boKUp9vBHNAJp7XbWZCK",
  "point":{
    "promoted_products_ids":[
      {"id":"760493597149625959620000"},
      {"id":"760493597149625959620000"}
    ],
    "pin":"1234",
    "place_id":"6088",
    "isDoneByGesture":false
  },
  "longitude":0.0,
  "latitude":0.0
}
Received reply:
HTTP/1.1 422 Unprocessable Entity
Server: nginx
Date: ...
Content-Type: application/json; charset=utf-8
Content-Length: 99
Connection: keep-alive
Vary: Accept-Encoding

{
  "status":"422 Unprocessable Entity",
  "code":"incorrectArgument",
  "title":"Incorrect argument: pin."
}
The request is not complicated. Parameters are sent as JSON data, there are no hash values being sent as a form of anti-tampering method with account state verification and the PIN is sent just in plain-text. The parameters are pretty self explanatory:
- authentication_token – This is the account’s authentication token that was received from the server during the login process. This value is unique to every EatApp account and won’t change.
- promoted_products_ids – the array of product type IDs that we are earning points for.
- pin – the PIN number that we’ve entered.
- place_id – the unique ID of the restaurant where we want to earn points.
- isDoneByGesture – this one is a mystery, but I believe it is set to true only when you spend your points.
- longitute and latitude – These are the last known GPS location values that were retrieved recently, letting the server know user’s exact geographical location. This could be used as a security measure to detect if we are not too far away from the restaurant we are receiving points in.
At this point I wanted to try out if the application is vulnerable to PIN brute-forcing. After all, there are only 10’000 possible PIN combinations. Unfortunately after sending about 5 requests with different PIN values, I started to receive the following reply from the server:
HTTP/1.1 422 Unprocessable Entity
Server: nginx
Date: ...
Content-Type: application/json; charset=utf-8
Content-Length: 289
Connection: keep-alive
Vary: Accept-Encoding

{
  "status":"422 Unprocessable Entity",
  "code":"pinTooManyAttempts",
  "title":"Too many pin code attempts",
  "header":"Account locked",
  "message":"Earning and spending points and redeeming deals using your account has been locked for the next 30 minutes. Please let us know if this is a mistake."
}
Unless I had hundreds of EatApp accounts that I could switch between during the brute-force process, the 30 minutes account lockdown is a pretty strong deterrent.
Looking at the parameters of the verification request, I wondered what would the parameters be if the verification was done with the beacon swipe rather than with entering the PIN.
One idea of how free points could be earned, would be to remotely intercept the request packet with the correct PIN value entered by the restaurant’s staff. Intercepting the packet remotely would also give me an opportunity to find the exact request parameters if beacon swipe was used instead of the PIN.
Main obstacle in performing this task is that I had to intercept the request from the mobile device, while I was at the restaurant.
That was a great opportunity to try setting up the interception VPN that would be used with 3G/4G connection on my mobile phone. The VPN server would then intercept and decrypt the HTTPS traffic the same way Fiddler did.
The Evil VPN
First of all, I required a VPS where I could install the VPN software. The fastest, easiest and most reliable way to set up a Linux box VPS is Digital Ocean (you will get 10$ credit if you sign up from this link). I created the cheapest Debian 8 1CPU 512MB RAM droplet for 5$/month or 0.007$/hour. This had to be more than enough for my needs.
I had to decide which VPN protocol I wanted to use. Android officially supports PPTP and L2TP types of VPN protocols. I’ve learned though that although PPTP is supported, it is considered insecure and Google doesn’t trust it enough to enable Always-On feature for this kind of VPN. Always-On VPN feature in Android makes sure that your phone will reconnect to the VPN whenever the connection breaks and makes sure that no other packet will ever be sent NOTthrough the VPN. This is very important as I wanted to be absolutely sure that every single packet gets intercepted and decrypted.
Finding a good tutorial that would teach me how to install L2TP VPN on Debian 8 was very hard as most tutorials were written for Debian 7 and apparently in the later version of the system some dependencies changed and the tutorials became outdated.
Finally I found a perfect way to install IPsec/L2TP VPN with auto setup scripts. This is basically all I had to do on the server:
wget https://git.io/vpnsetup -O vpnsetup.sh
nano -w vpnsetup.sh
[Replace with your own values: YOUR_IPSEC_PSK, YOUR_USERNAME and YOUR_PASSWORD]
sudo sh vpnsetup.sh
YOUR_IPSEC_PSK – this should be you preshared key phrase (e.g. mysecretpskforvpn).
YOUR_USERNAME and YOUR_PASSWORD – your username and password to login into the VPN.
All done in fire and forget manner! The VPN was up and running. Now it was time to set up the VPN connection on my phone. I went to Settings > Wireless & Networks (More) > VPN and added a new VPN and filled the settings as follows:
Name: vpn_interceptor
Type: L2TP/IPSec PSK
Server address: [VPN_SERVER_IP]
L2TP secret: (not used)
IPSec identifier: (not used)
IPSec pre-shared key: [YOUR_IPSEC_PSK]
DNS search domains: (not used)
DNS servers: 8.8.8.8
Forwarding routes: (not used)
Now that the VPN was added, I clicked the triple-dot Settings button in the same window and clicked Always-On option and then picked the newly created VPN connection.
This is when I ran into a problem on my Android 6.0. No matter how hard I wanted the VPN to connect, it would always show connection error. I tried on another Android 4.4 device and it worked perfectly, so I knew something was wrong with the latest version of Android. The Github page of the auto script did mention a workaround for Android 6 Marshmellow:
Note: Android 6 (Marshmallow) users should edit /etc/ipsec.conf on the VPN server and append ,aes256-sha2_256 to both ike= and phase2alg= lines. Then add a new line sha2-truncbug=yes immediately after those. Indent lines with two spaces. When finished, run service ipsec restart.
That didn’t work, so I removed that “fix” from the server config files. Shortly after, I found a feature in the VPN profile settings called Backwards-compatible mode. I set that to Enable and *bang* – finally everything started to work.
Now that I had a working VPN, it was time to set up the interception and decryption of HTTPS packets. For that I decided to use SSLsplit software. Installation was easy:
wget http://mirror.roe.ch/rel/sslsplit/sslsplit-0.5.0.tar.bz2
tar jxvf sslsplit-0.5.0.tar.bz2
cd sslsplit-0.5.0
make
sudo make install
The IPSec/L2TP installation script created some advanced firewall settings for my new VPN setup and honestly I was not able to adjust it in such a way that allowed me to redirect HTTP/HTTPS packets to sslsplit proxy. I decided to completely purge the iptables settings and replace the iptables config file with the clean one, including some settings for redirecting packets to sslsplit.
iptables -F
iptables -t nat -F
iptables -t nat -A POSTROUTING -o eth0 -j MASQUERADE
iptables -t nat -A POSTROUTING -o ppp+ -j MASQUERADE
iptables-save > /etc/iptables.rules
Packet forwarding should already have been enabled (and should be re-enabled at every boot), because of the VPN auto setup script, but in order to be sure, you could run:
echo 1 > /proc/sys/net/ipv4/ip_forward
Next, I prepared the directory structure for sslsplit log files and created thesslsplit root certificate that will be used for generating forged HTTPS certificates the same way that Fiddler did before:
mkdir sslsplit
mkdir sslsplit/certs
mkdir sslsplit/logs
cd sslsplit/certs
openssl genrsa -out ca.key 2048
openssl req -new -x509 -days 3650 -key ca.key -out ca.crt
I had to download sslsplit/certs/ca.crt root certificate from the VPS, copy it my phone’s SD card and import it as trusted certificate authority. That way my Android phone would allow any forged certificate generated by sslsplit to be accepted. You could easily download ca.crt file from your VPS via SSH protocol on Windows using WinSCP.
In order to easily turn on and off our HTTP/HTTPS interception, on the server, I decided to create two small shell scripts (my sslsplit directory was put in /root/):
/root/sslsplit/start.sh
#!/bin/bash
iptables-restore < /etc/iptables.rules
iptables -t nat -A PREROUTING -i ppp+ -p tcp --dport 80 -j REDIRECT --to-ports 8080
iptables -t nat -A PREROUTING -i ppp+ -p tcp --dport 443 -j REDIRECT --to-ports 8443
sslsplit -d -l /root/sslsplit/connections.log -j /root/sslsplit/ -F /root/sslsplit/logs/%T -k certs/ca.key -c certs/ca.crt ssl 0.0.0.0 8443 tcp 0.0.0.0 8080
/root/sslsplit/stop.sh
#!/bin/bash
killall sslsplit
iptables-restore < /etc/iptables.rules
Now whenever I wanted to start intercepting packets, I’d run ./start.sh and if I wanted to stop, ./stop.sh. Simple. The sslsplit was configured to run as a daemon and it would log all raw packets into separate files in /root/sslsplit/logs/ directory. The logging feature of sslsplit is not perfect as it doesn’t fully decode saved HTTP packets, it doesn’t group packets in request/reply order and will put several packets into one file if they are sent at the same exact second, but for my needs it had to do fine. I will later describe how I overcame the HTTP decoding issue.
With the VPN setup done and HTTPS interception in place, I was finally able to drive to town, eat something and do some live packet capturing!
Trip to town
I visited three places and ordered some food in each one of them. During checkout I asked the vendor to register some EatApp points for the products I just had. At that point my phone was all the time connected to the interception VPN and the authorization packets were logged on the server by sslsplit.
I found out that if the location permission was turned off, the beacon proximity feature wouldn’t work, thus in two places the staff had to use the PIN authorization. I retrieved two packets with correct PIN values in the first two places and in the third place I was able to capture the beacon authorization packet, after I enabled the location permission for the app.
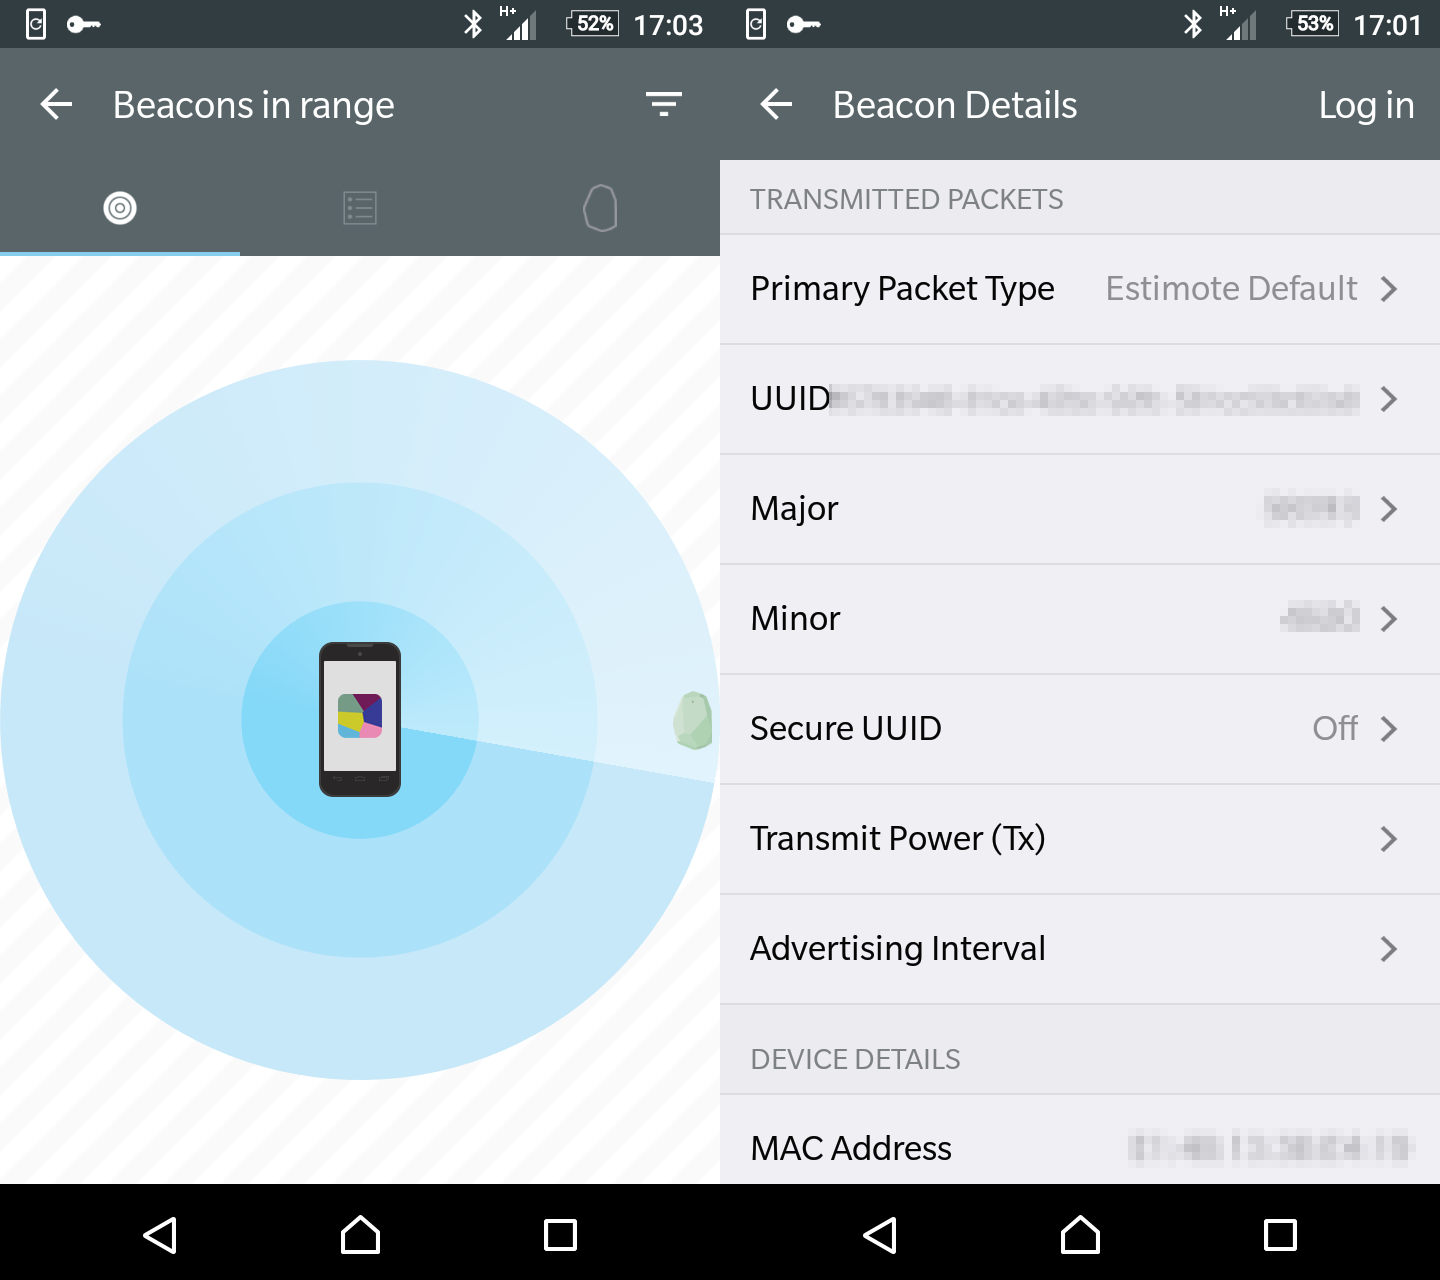
Finally I had an opportunity to check out the official Estimote developer’s app that was supposed to detect nearby beacon broadcasts and retrieve the broadcasted UUID, Major and Minor. It turned out my theory was correct:
I still had to confirm at home if the broadcasted authorization keys were really used in the authorization packet, by analyzing the sslsplit log files.
Connecting the dots
I downloaded the sslsplit log files from the server. The issue with sslsplit is that it will log all HTTP packets in their raw form. Meaning that if the Transfer-Encoding is chunked or packet is compressed with gzip, the packets won’t be logged in decoded plain-text form.
I have released a small script that is supposed to decode the sslsplit packets into clear text form. Please note that script uses a quite buggy http-parserlibrary that I decided to use for parsing HTTP packets. For simple needs, though, it is “good enough”. You can find splitparse.py on Github here.
Usage:
pip install http-parser
python splitparse.py -i [sslsplit_logs_dir] -o [output_dir]
I quickly found the request packet with the authorization data that was sent when the beacon was swiped over my phone:
POST /users/461845f5d03e6c052a43afbc/points
Accept: application/json
Accept-Language: en-gb
X-App-Version: 1.28.0
User-Agent: Dalvik/2.1.0 (Linux; U; Android 6.0.1;)
...
Content-Type: application/json; charset=UTF-8
Content-Length: 375
Host: api.eatapp.com
Connection: Keep-Alive
Accept-Encoding: gzip

{
  "authentication_token":"boKUp9vBHNAJp7XbWZCK",
  "latitude":...,
  "longitude":...,
  "point":{
    "isDoneByGesture":false,
    "main_beacon":{
      "major":38995,
      "minor":12702,
      "uuid":"2C75E74B-41B7-49E3-BD26-CE86B2F569F8"
    },
    "place_id":"450",
    "promoted_products_ids":[
      {"id":"647035946536601578040000"},
      {"id":"647035946536601578040000"},
      {"id":"647035946536601578050000"}
    ]
  }
}
Jackpot! I confirmed that the UUID, Major and Minor numbers were exactly the same in the request authorization packet and detected live with the Estimote developer’s app. That meant my theory was correct and the verification keys are constantly being broadcasted over the air in every EatAppsupported restaurant.
To summarize, here is the step-by-step guide on how to get free EatApp points in restaurant ZZZ:
- Walk into restaurant ZZZ.
- Open up Estimote developer’s app and detect the closest nearby beacon.
- Save the screenshot with the visible UUID, Major and Minor values.
- Go home.
- Set a breakpoint in Fiddler to intercept EatApp packets with
/users/path in GET requests. - On your phone, select the ZZZ restaurant and set EatApp to await PIN authorization for earned points.
- Enter any PIN.
- Modify the intercepted packet in Fiddler, removing the
"pin":"NNNN"entry and replacing it with the valid"main_beacon":{...}content containing the beacon keys captured with Estimote app. - Let the modified packet through to EatApp server.
- Enjoy your free points!
Of course it would be much better to write you own tool to directly communicate with application’s server API while implementing proper location spoofing. The method I described is just quicker and easier for testing purposes.
Conclusion
Broadcasting authorization keys publicly over the air is never a good idea. Here is the list of things that could be done to improve EatApp’s security:
- Send a hash value of account’s current state as an additional request parameter (points for every restaurant, account name, last sent GPS location etc.). The server would then verify if the hash is correct and only then authorize the request. Finding out how the hash parameter is formed would not be possible without disassembling and reverse engineering the application’s code. That would add additional difficulty.
- In order to make reverse engineering harder, the application’s code should be obfuscated. If the additional hash verification parameter was implemented, it would greatly increase the difficulty of reverse engineering the application’s code.
- @FabricatorGeneral mentioned in the comment section that it is possible to enable Secure UUID feature in Estimote’s beacons that would broadcast the beacon keys in encrypted form. That way only applications with the correct API key would be able to decrypt it. Bypassing that would require writing a custom mobile application implementing Estimote SDK, that would listen to broadcasts, decrypting them with application’s API key, that would have to be retrieved first by reverse engineering the application’s code.
- Certificate pinning should be implemented to make it harder to intercept the HTTPS connection using forged certificates. This security feature could also be bypassed, but it would involve reverse engineering the application, finding where the certificate verification check is done, removing it and recompiling the application again.
- Not sure if that is possible with Estimote Beacon’s, but it would be good to provide restaurants with a second beacon that would be used only for authorizing transactions with maximum broadcast range of half meter.
- Never trust the client’s device! For maximum security, client’s device should only send the reward request to the server, without any authorization keys. Afterwards, the server would send the authorization request to vendor’s dedicated tablet behind the counter, requesting him to authorize the point rewards with proper keys. Beacon swiping or entering the PIN would only be done on vendor’s device, thus making it impossible for the client to intercept the request that he could later use to create forged packets.
Source:https://breakdev.org