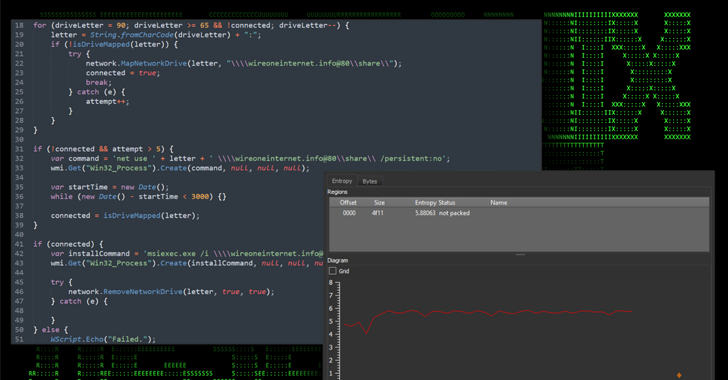
Information security researchers often require plugins for vulnerability scanners in Kali Linux, although due to licensing restrictions these tools are not included in the distribution. Fortunately Kali includes OpenVAS, which is free and open source, as mentioned by vulnerability testing specialists from the International Institute of Cyber Security (IICS).
In this article we’ll show you how to set up, run, and automate OpenVAS in this distribution. You may find this information really useful, as vulnerability analysis tools often have limited functions.
Vulnerability scanners may be useful, but they are not able to provide researchers with all the information they require. Launching a vulnerability testing tool without prior analysis can be a headache for researchers and even lead to erroneous results.
System requirements
The main complaint from vulnerability testing experts about OpenVAS is that it is too slow, crashes and does not work. This may have more than one explanation, although the most common is that the system on which it is running does not have sufficient resources for its proper functioning.
Some commercial vulnerability scanners require at least 8 GB of RAM; While OpenVAS doesn’t require as many resources, the tool will run better on higher-capacity systems. For this tutorial, OpenVAS will run on a Kali VM with 3 processors and 3 GB of RAM, which is usually enough to scan a small number of hosts at the same time.
Initial installation
OpenVAS has a lot of modifiable options, so adjusting the tool manually is a considerable problem. Luckily Kali Linux has the “openvas-setup” utility to manage the configuration and download of firms, as well as generate a password for the administrator user.
At the end of the configuration, an automatically generated password will be displayed for the admin user. Be sure to keep this password in a safe place, recommended by vulnerability analysis specialists.
root@kali:~# openvas-setup
ERROR: Directory for keys (/var/lib/openvas/private/CA) not found!
ERROR: Directory for certificates (/var/lib/openvas/CA) not found!
ERROR: CA key not found in /var/lib/openvas/private/CA/cakey.pem
ERROR: CA certificate not found in /var/lib/openvas/CA/cacert.pem
ERROR: CA certificate failed verification, see /tmp/tmp.7G2IQWtqwj/openvas-manage-certs.log for details. Aborting.ERROR: Your OpenVAS certificate infrastructure did NOT pass validation.
See messages above for details.
Generated private key in /tmp/tmp.PerU5lG2tl/cakey.pem.
Generated self signed certificate in /tmp/tmp.PerU5lG2tl/cacert.pem.
...
/usr/sbin/openvasmd
User created with password 'xxxxxxx-xxxx-xxxx-xxxx-xxxxxxxxxx'.
Identification of installation errors
Remember that sometimes the “openvas-setup” script will display errors at the end of NVT boot similar to those shown below:
(openvassd:2272): lib kb_redis-CRITICAL **: get_redis_ctx: redis connection error: No such file or directory
(openvassd:2272): lib kb_redis-CRITICAL **: redis_new: cannot access redis at '/var/run/redis/redis.sock'
(openvassd:2272): lib kb_redis-CRITICAL **: get_redis_ctx: redis connection error: No such file or directory
openvassd: no process found
If you encounter this problem on your system, you can run openvas-check-setup to find out what the problematic component is.
In this particular case, we get the following answer:
...
ERROR: The number of NVTs in the OpenVAS Manager database is too low.
FIX: Make sure OpenVAS Scanner is running with an up-to-date NVT collection and run 'openvasmd --rebuild'.
...
The openvas-check-setup script detects the problem and even provides a command to run a solution. After restoring the NVT collection, it is recommended that you pass all checks.
root@kali:~# openvasmd --rebuild
root@kali:~# openvas-check-setup
openvas-check-setup 2.3.7
Test completeness and readiness of OpenVAS-9
...
It seems like your OpenVAS-9 installation is OK.
...
OpenVAS user management
If you need to create additional users for OpenVAS you can run openvasmd with the -create-user option, which will add a new user and display a randomly generated password for the new user.
root@kali:~# openvasmd --create-user=dookie
User created with password 'yyyyyyyy-yyyy-yyyy-yyyy-yyyyyyyyyy'.
root@kali:~# openvasmd --get-users
admin
dookie
Luckily, vulnerability testing experts mention that changing OpenVAS users’ passwords is easy with the “openvasmd” and “new-password” options.
root@kali:~# openvasmd --user=dookie --new-password=s3cr3t
root@kali:~# openvasmd --user=admin --new-password=sup3rs3cr3t
Start and stop OpenVAS
Network services are disabled by default in Kali Linux, so if you have not configured OpenVASto start booting, you can start the required services by running “openvas-start”.
root@kali:~# openvas-start
Starting OpenVas Services
Once you have a list of hosts, you can import them into the Configure Goals section of the menu. When the services have finished initializing, you should find TCP ports 9390 and 9392 that are listening on their loopback interface.
root@kali:~# ss -ant
State Recv-Q Send-Q Local Address:Port Peer Address:Port
LISTEN 0 128 127.0.0.1:9390 *:*
LISTEN 0 128 127.0.0.1:9392 *:*
Due to the high consumption of system resources, experts recommend stopping OpenVAS processes when you have stopped using the tool, especially if you are not using a sophisticated vulnerability testing system.
Finally, remember that OpenVAS can be closed by running “openvas-stop”.
root@kali:~# openvas-stop
Stopping OpenVas Services
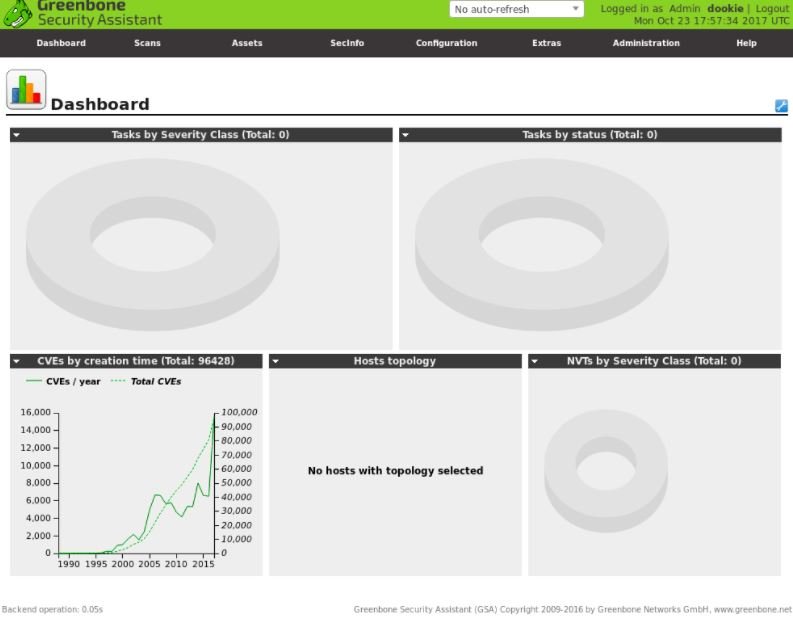
Using Greenbone Security Assistant
Greenbone Security Assistant is an OpenVAS web interface available on the local system after starting OpenVAS on https://localhost: 9392. After accepting the certificate you will be presented with a login page where you will need to authenticate to access the main dashboard.
Credentials setting
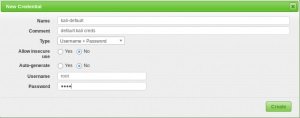
Vulnerability scanners bring more complete results when target system credentials are provided to the scan engine. OpenVAS will use these credentials to log in to the scanned system and make a detailed list of installed software, security patches, among other data.
Users can add credentials through the Credentials entry in the Settings menu.
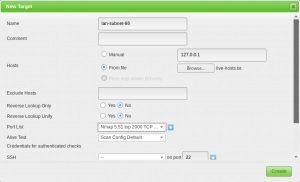
Target setting
OpenVAS is capable of scanning remote systems, although it is not itself a port scanner. To do a complete job, experts recommend using a specialized network scanner such as Nmap.
root@kali:~# nmap -sn -oA nmap-subnet-86 192.168.86.0/24
root@kali:~# grep Up nmap-subnet-86.gnmap | cut -d " " -f 2 > live-hosts.txt
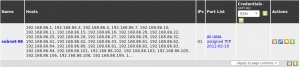
Once you have a list of hosts, you can import them into the target section of the Settings menu.
Analysis setting
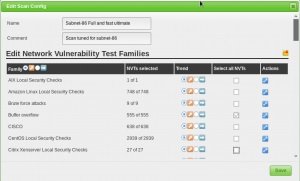
Before running a vulnerability testing process, you must properly adjust the Scan Config/ option. This action is completed with the “Scans Config” menu in the “Config” menu; here you can clone any default scan settings and edit their settings, disabling any services or verifications you don’t need.
If you use Nmap to perform a preliminary scan of the target system, you can save time searching for vulnerabilities.
Tasks settings
Vulnerability testing is done in the OpenVAS Task menu. When you set up a new task, you can optimize the analysis by modifying the concurrent activities on your system; in the example system (3GB RAM), you can adjust the settings as shown in the following example:
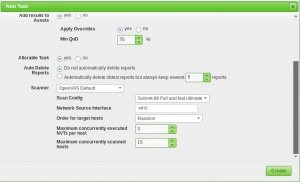
With our scanning and target selection parameters set, our scan results will be much more useful.
OpenVAS Automation
One of the lesser-known functions of OpenVAS is the interface with which it interacts using the “omp” command. This feature is not intuitive, but we will show you how to use this tool with some basic scripts.
The first is openvas-automate.sh, a semi-interactive Bash script that will prompt the user for a type of analysis and, from that information, will take care of the rest. Scan settings are coded in the script, so if you want to use your own custom settings, you can add them in the “target” section.
root@kali:~# apt -y install pcregrep
root@kali:~# ./openvas-automate.sh 192.168.86.61:: OpenVAS automation script.
mgeeky, 0.1[>] Please select scan type:
1. Discovery
2. Full and fast
3. Full and fast ultimate
4. Full and very deep
5. Full and very deep ultimate
6. Host Discovery
7. System Discovery
9. Exit

--------------------------------
Please select an option: 5

[+] Tasked: 'Full and very deep ultimate' scan against '192.168.86.61'
[>] Reusing target...
[+] Target's id: 6ccbb036-4afa-46d8-b0c0-acbd262532e5
[>] Creating a task...
[+] Task created successfully, id: '8e77181c-07ac-4d2c-ad30-9ae7a281d0f8'
[>] Starting the task...
[+] Task started. Report id: 6bf0ec08-9c60-4eb5-a0ad-33577a646c9b
[.] Awaiting for it to finish. This will take a long while...

8e77181c-07ac-4d2c-ad30-9ae7a281d0f8 Running 1% 192.168.86.61
There is also a code16 option that introduces and explains your Python script for interacting with OpenVAS. As in the previous Bash script, you’ll need to make some changes to the script if you want to customize the analysis type.
root@kali:~# ./code16.py 192.168.86.27
------------------------------------------------------------------------------
code16
------------------------------------------------------------------------------
small wrapper for OpenVAS 6[+] Found target ID: 19f3bf20-441c-49b9-823d-11ef3b3d18c2
[+] Preparing options for the scan...
[+] Task ID = 28c527f8-b01c-4217-b878-0b536c6e6416
[+] Running scan for 192.168.86.27
[+] Scan started... To get current status, see below:zZzzZzzZzzZzzZzzZzzZzzZzzZzzZzzZzzZzzZzzZzzZzzZzzZzzZzzZzzZzzZzzZzzZzzZzzZzz
...
zZzzZzzZzzZzzZzzZzzZzzZzzZzzZzzZzzZzzZzzZzzZzzZzzZzzZzzZzzZzzZzzZzzZzzZzzZzz
[+] Scan looks to be done. Good.
[+] Target scanned. Finished taskID : 28c527f8-b01c-4217-b878-0b536c6e6416
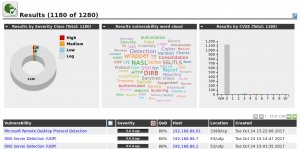
[+] Cool! We can generate some reports now ... :)
[+] Looking for report ID...
[+] Found report ID : 5ddcb4ed-4f96-4cee-b7f3-b7dad6e16cc6
[+] For taskID : 28c527f8-b01c-4217-b878-0b536c6e6416
[+] Preparing report in PDF for 192.168.86.27
[+] Report should be done in : Report_for_192.168.86.27.pdf
[+] Thanks. Cheers!
Vulnerability testing experts surely will find this article really useful. This material was developed for teaching purposes. To consult more material like this, please feel free to visit official platforms of the International Institute of Cyber Security (IICS).


Cyber Security Specialist with 18+ years of industry experience . Worked on the projects with AT&T, Citrix, Google, Conexant, IPolicy Networks (Tech Mahindra) and HFCL. Constantly keeping world update on the happening in Cyber Security Area.