 Short Bytes: Very often Windows 10 users complain that their PC is using tons of data and what should they do about it. Being an operating system that’s designed to stay connected to the internet, Windows 10 consumes tons of data. However, using some simple methods like marking your internet connection metered and controlling data usage of particular applications, you can save considerable amount of data.
Microsoft has developed Windows 10 as a universal operating system that can run on different devices like PC, Windows Phone, Surface, and even HoloLens. To keep things connected and updated, Microsoft has built in some data collecting tools that need constant connection to the internet.
Being an always-connected and up-to-date operating system, Windows 10 is the most data-hungry version of Windows till date. This could make Windows 10 a headache if you are stuck with a limited data plan or a slow connection. There might be a situation when you would be trying to browse the web to access some important information and your OS would be busy updating the system.
How to save your data in Windows 10?
To get rid of such situations and make your Windows 10 PC use lesser data, there are several ways that I’m going to list ahead:
Set your Wi-Fi connection as metered:
One of the first things that you need to do is set your internet connection as metered. Note that this setting can only be enabled on Wi-Fi connections. This shouldn’t be a problem these days as most of us are dependent on Wi-Fi for going online.
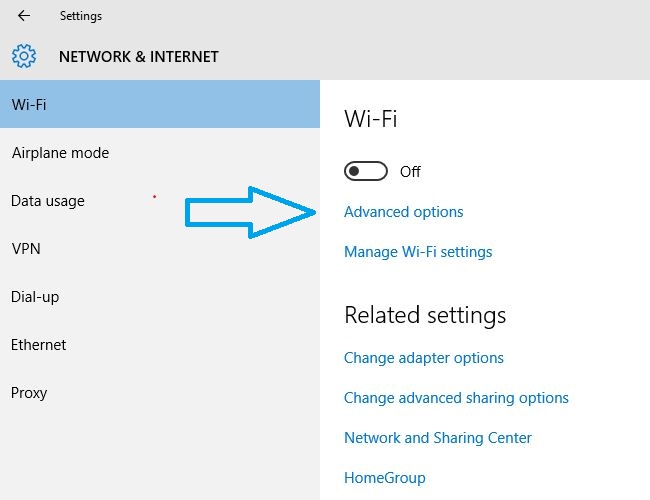
So, here’s how to set your internet connection as metered. Just locate Network & Internet option in Settings, find your connection name in Wi-Fi and then select Advanced Options.
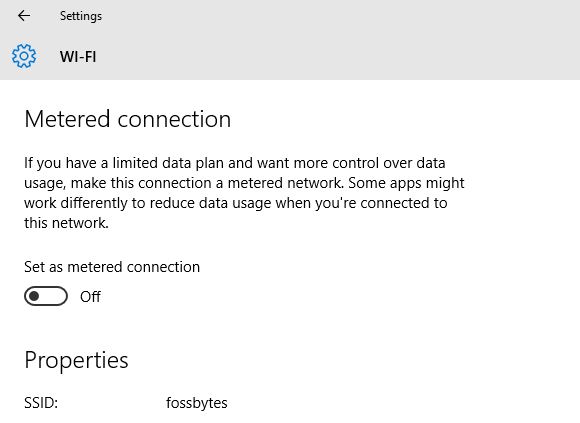
Here, you’ll spot the option Metered connection. Now, enable the Set as metered connection slider.
Turn off forced Windows Update
Frequent and forced Windows Updates are the number one cause for high data usage in Windows 10 operating system. It gets disabled on its own by enabling the metered connection. It’s already explained above.
But, if you are using a wired internet connection i.e. Ethernet, you need to do something else. Here’s a dedicated article that tells you how to turn off the forced update on Windows 10. This article covers methods like stopping Windows 10 Update service from startup, a small patch for Windows 10 Home, making changes to Windows 10 Registry, and disabling some specific Windows 10 updates.
Check data usage of applications:
Very often you don’t have a clue that which application is using the majority of data on your Windows PC. With Windows 10, Microsoft has brought a new Data Usage tool that gives you clear information regarding which application is using how much data on your computer.
To open this tool, you need to locate Network & Internet in the Settings option and then click on Data Usage. Here, you’ll see which applications are using how much data.
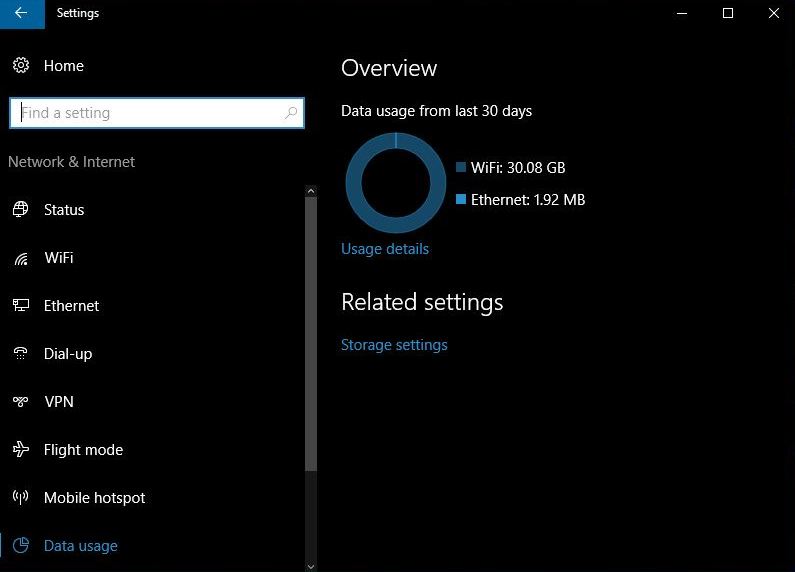
You can click on Usage Details and see a list of all the applications. The ones that have used the most data will be at the top. So, using this information you can manually control the data usage.
Disable peer-to-peer update sharing:
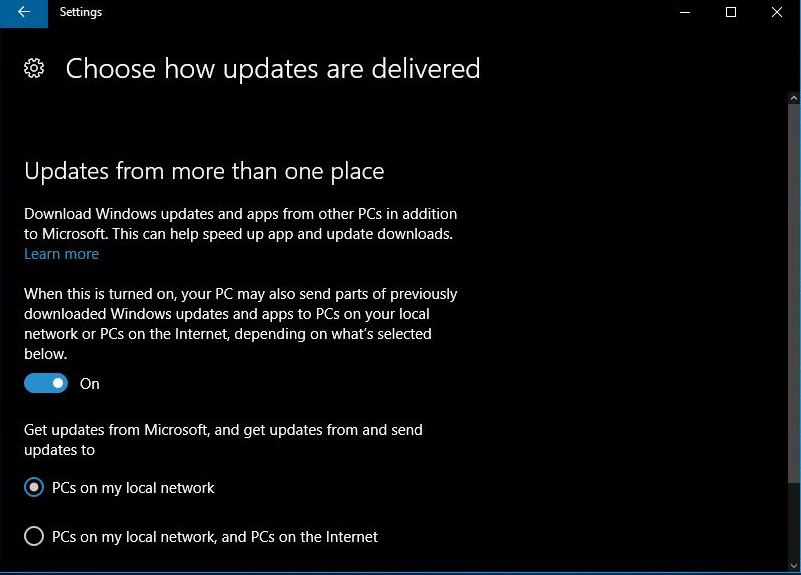
To make its update process faster and more effective, Microsoft brought along the option of peer-to-peer update sharing in Windows 10. With this method, Microsoft is able to distribute updates to people on the same network even without internet connection. This also results in lesser stress on Microsoft servers.
So, by turning off the peer-to-peer update sharing one can save lots of data. If you’ve already set your connection metered, Microsoft won’t be uploading updates. If you haven’t there’s a direct method to do this.
You need to locate Windows Update option in Settings. There, you have to click on Advanced Options and then go to Choose How Updates are Delivered. Here, you need to disable this option or set it as PCs on My Local Network.
Disable the automatic app and Live Tile updates:
If one particular internet connection is set metered, your Windows 10 PC won’t be downloading app and Live Tiles updates on that network. However, by doing a small change, you can enable this setting on all networks.
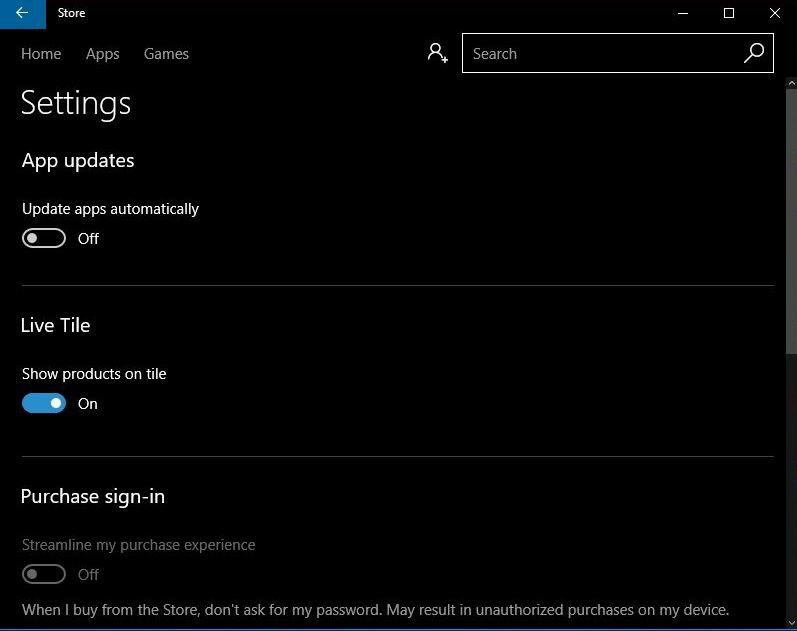
To do this, you need to open Windows Store app, click on your profile picture, and select Settings. Here, you need to disable the Update Apps Automatically checkbox.
To stop a Live Tile from using your data, you need to prevent it from automatically downloading and displaying updated data. To do this, you need to right-click on a tile, point to More, and select Turn The Live Tile Off.
Bonus tip: Enable Data Saver in web browser
There are chances that your web browser has a Data Saver mode somewhere hidden in the settings. Normally this feature is found in the smartphones. However, Google Chrome for PC comes with a Data Saver Extension that saves your data. Similarly, the Opera web browser has a Turbo Mode that saves your data.
Did you find this article helpful? Don’t forget to drop your feedback in the comments section below.
Also Read: The complete Windows 10 tutorials and how to guide


