
Short Bytes: In the third article of the Getting Started With Raspberry Pi series, I’ll tell you how to install a basic operating system on your Raspberry Pi and start building exciting things. Using NOOBS, you can easily install different operating systems on your new DIY-companion.
In the previous articles in our Getting Started With Raspberry Pi series, we have told you the basics of Raspberry Pi and all the things you need to collect before starting any project.
Once you’ve got everything, you can start setting your Raspberry Pi up and install a basic operating system. Just like a normal computer, you need to create a bootable image, go through the installation process, and boot your Raspberry Pi for the first time.
If you still need some components, here is the link of our store giving you the complete Raspberry Pi 3 starter kit at attractive price: Raspberry Pi 3
Which operating system should I install on Pi?
Raspberry Pi is powered by ARM processor and your usual operating system images of Windows 10, Ubuntu Linux etc. can’t be installed on it.
Instead, you need to select an operating system that is supported by the Raspberry Pi’s ARM architecture. There are numerous supported operating systems like Raspbian, Arch Linux ARM, OpenWrt, Ubuntu MATE etc.

Here, I’ll tell you how to install Raspbian OS to get started as it’s the easiest option for the beginners. It’s Raspberry Pi Foundation’s officially supported operating system. Raspbian comes pre-installed with many necessary software that are useful for learning, programming, and web browsing.
Instead of using a Raspbian OS image, here we’ll be using NOOBS–New Out Of Box Software–an install manager for Raspbian.
Downloading NOOBS for Raspberry Pi: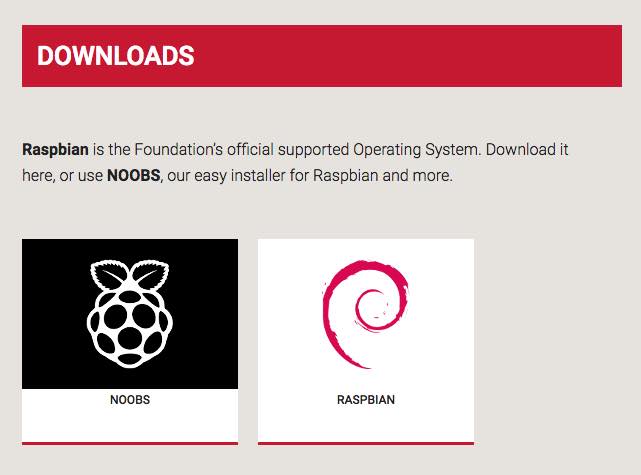


On your computer, visit the NOOBS Downloads page. You’ll be spotting two versions — NOOBS and NOOBS Lite. Click on the Download ZIP button and save the files on your computer.
Now extract the files of the zipped NOOBS file into some other folder.
Preparing the SD card and transferring NOOBS:
Before transferring the NOOBS files onto the SD card, you need to format it. The Raspberry Pi Foundation recommends a minimum 8GB SD card.
Windows and Mac:
For formatting, you need to use SD Association’s SD Formatter software for Windows or Mac.
After installing the software, you need to connect the SD card to your computer and look for the drive letter associated with it. Look for the “FORMAT SIZE ADJUSTMENT” option in the SD Formatter software Options menu and set it to ON. Now select the drive letter and format it.
Linux:
Linux users are advised to gparted or some other command line tool for this formatting task.
After your SD card is formatted, open the folder where the NOOBS files have been extracted. Simply copy-paste or drag all the files directly to the SD card.
After this step, you need to insert the SD card in its slot. I expect that you’ve connected the other components to the Pi. If you haven’t, you can refer the Part 2 of this Getting Started With Raspberry Pi series.

Booting Raspberry Pi for the first time:
Power the system up by connecting the power supply to Raspberry Pi. You’ll see the setup initializing on your screen:

After a few moments of initialization, you see the NOOBS window that’ll look something like this:

You can see various operating systems available. Here, Raspbian OS is the recommended download and we’ll proceed with that. Make the proper section and hit the install button.
Now NOOBS installer will install Raspbian on your Raspberry Pi for the first time and it would take a while, so go grab a cup of coffee.
After the installation process is completed, you’ll see a raspi-config window. Here you can set your region, adjust the date, create different users, and explore other options. After completing this configuration, select the Finish option.
Now you can reboot you Raspberry Pi and when boots again, it’ll be ready to use with the new configuration. To login, use these default credentials:
Username: pi
Password: raspberry
To load the Raspbian GUI, just type startx and hit Enter.
Congratulations, you’ve installed Raspbian on your Raspberry Pi and you are ready to explore a whole new world.
For interesting and advanced Raspberry Pi tutorials, you can visit the Raspberry Pi DIY section on fossBytes.
Get The Complete Raspberry Pi 3 Starter Kit at fossBytes Store.